Playwright Agents β€” 🎭 Planner, 🎭 Generator, 🎭 Healer

What are Playwright Agents?

This article distills the official guidance and demo video into a practical, production‑ready walkthrough. Playwright ships three agents you can run independently or in a loop: 🎭 Planner, 🎭 Generator, and 🎭 Healer.

🎭 Planner

Explores your app and produces a human‑readable Markdown plan.

  • Input: a clear request (e.g. “Generate a plan for guest checkout”), a seed test, optional PRD.
  • Output: specs/*.md with scenarios, steps, and expected results.

🎭 Generator

Converts the Markdown plan into executable Playwright tests and validates selectors/assertions during generation.

  • Input: Markdown from specs/, seed test and fixtures.
  • Output: tests/*.spec.ts aligned to the plan.

🎭 Healer

Runs tests, replays failures, proposes patches (locator updates, waits, data fixes) and re‑runs until passing or guardrails stop.

  • Input: failing test name.
  • Output: a passing test or a skipped test if functionality is broken.
🎭 Planner β†’ 🎭 Generator β†’ 🎭 Healer Overview

1. Requirements

  • Node.js 18+ and npm
  • Playwright Test latest version
  • VS Code 1.105+ (Insiders channel) for full agentic UI experience
  • AI Assistant – Choose one: Claude Code, OpenCode, or VS Code with AI extensions
  • Git for version control
  • Modern web browser (Chrome, Firefox, Safari)

2. Step-by-Step Installation Guide

Step 1: Prerequisites

  • Install Node.js 18+ from nodejs.org
  • Install npm (comes with Node.js)
  • Install VS Code 1.105+ from VS Code Insiders for agentic experience
  • Choose and install an AI Assistant:
    • Claude Code – for Claude integration
    • OpenCode – for OpenAI integration
    • VS Code with AI extensions – for built-in AI features
  • Install Git for version control

Step 2: Navigate to Demo Directory

# Navigate to the demo directory
C:\Users\ADMIN\Documents\AI_QUEST_LTP> cd "playwright Agent Test Example - PhatLT"

Step 3: Install Dependencies

playwright Agent Test Example - PhatLT> npm install
playwright Agent Test Example - PhatLT> npx playwright install

Step 4: Initialize Playwright Agents

# Initialize agent definitions for Claude Code (recommended)
playwright Agent Test Example - PhatLT> npx playwright init-agents --loop=claude

# Or for VS Code
playwright Agent Test Example - PhatLT> npx playwright init-agents --loop=vscode

# Or for OpenCode
playwright Agent Test Example - PhatLT> npx playwright init-agents --loop=opencode

Step 5: Verify Setup

# Test seed file
playwright Agent Test Example - PhatLT> npx playwright test tests/seed-agents.spec.ts

# Check project structure
playwright Agent Test Example - PhatLT> dir .claude\agents
playwright Agent Test Example - PhatLT> dir .github
playwright Agent Test Example - PhatLT> dir specs
playwright Agent Test Example - PhatLT> npm init -y
Wrote to playwright Agent Test Example - PhatLT\package.json:
{
  "name": "phatlt-playwright",
  "version": "1.0.0",
  "main": "index.js",
  "scripts": {
    "test": "playwright test",
    "test:headed": "playwright test --headed",
    "test:ui": "playwright test --ui",
    "test:debug": "playwright test --debug",
    "test:chromium": "playwright test --project=chromium",
    "test:firefox": "playwright test --project=firefox",
    "test:webkit": "playwright test --project=webkit",
    "report": "playwright show-report",
    "codegen": "playwright codegen"
  },
  "keywords": [],
  "author": "",
  "license": "ISC",
  "type": "commonjs",
  "description": "",
  "devDependencies": {
    "@playwright/test": "^1.56.0",
    "@types/node": "^24.7.2"
  }
}

playwright Agent Test Example - PhatLT> npm install -D @playwright/test
added 1 package, and audited 2 packages in 2s
found 0 vulnerabilities

playwright Agent Test Example - PhatLT> npx playwright install
Installing browsers...
βœ“ Chromium 120.0.6099.109
βœ“ Firefox 120.0
βœ“ WebKit 17.4

playwright Agent Test Example - PhatLT> npx playwright init
βœ“ Created playwright.config.ts
βœ“ Created tests/
βœ“ Created tests/example.spec.ts
βœ“ Created tests/seed.spec.ts

3. Step-by-Step Testing Guide

Step 1: Test Seed File

Run the seed test to verify Playwright Agents setup:

# Test seed file for agents
playwright Agent Test Example - PhatLT> npx playwright test tests/seed-agents.spec.ts

# Run with browser UI visible
playwright Agent Test Example - PhatLT> npx playwright test tests/seed-agents.spec.ts --headed

# Run in debug mode
playwright Agent Test Example - PhatLT> npx playwright test tests/seed-agents.spec.ts --debug

Step 2: Test Generated Tests

Run the example generated tests from the Generator agent:

# Run generated Google search tests
playwright Agent Test Example - PhatLT> npx playwright test tests/google-search-generated.spec.ts

# Run specific test by name
playwright Agent Test Example - PhatLT> npx playwright test --grep "Perform Basic Search"

# Run all tests
playwright Agent Test Example - PhatLT> npx playwright test

Step 3: Test Different Browsers

# Run tests only on Chromium
playwright Agent Test Example - PhatLT> npx playwright test --project=chromium

# Run tests only on Firefox
playwright Agent Test Example - PhatLT> npx playwright test --project=firefox

# Run tests only on WebKit
playwright Agent Test Example - PhatLT> npx playwright test --project=webkit

Step 4: Generate Test Reports

# Generate HTML report
playwright Agent Test Example - PhatLT> npx playwright show-report

# Run tests with UI mode
playwright Agent Test Example - PhatLT> npx playwright test --ui

Step 5: Using Playwright Agents

Now you can use the Playwright Agents workflow with Claude Code:

# In Claude Code, ask the Planner:
"I need test scenarios for Google search functionality. Use the planner agent to explore https://www.google.com"

# Then ask the Generator:
"Use the generator agent to create tests from the test plan in specs/"

# Finally, use the Healer if tests fail:
"The test 'Perform Basic Search' is failing. Use the healer agent to fix it."

4. Project Structure and Files

playwright Agent Test Example - PhatLT/
β”œβ”€β”€ .claude/agents/              # Claude Code agent definitions
β”‚   β”œβ”€β”€ playwright-test-planner.md    # 🎭 Planner agent
β”‚   β”œβ”€β”€ playwright-test-generator.md  # 🎭 Generator agent
β”‚   └── playwright-test-healer.md     # 🎭 Healer agent
β”œβ”€β”€ .github/                     # Official agent definitions
β”‚   β”œβ”€β”€ planner.md               # 🎭 Planner instructions
β”‚   β”œβ”€β”€ generator.md             # 🎭 Generator instructions
β”‚   └── healer.md                # 🎭 Healer instructions
β”œβ”€β”€ specs/                       # Test plans (Markdown)
β”‚   └── google-search-operations.md   # Example test plan
β”œβ”€β”€ tests/                       # Generated tests
β”‚   β”œβ”€β”€ seed-agents.spec.ts      # Seed test for agents
β”‚   └── google-search-generated.spec.ts  # Generated test example
β”œβ”€β”€ .mcp.json                    # MCP server configuration
β”œβ”€β”€ playwright.config.ts         # Playwright configuration
β”œβ”€β”€ package.json                 # Project dependencies
└── test-results/               # Test execution results

5. How Playwright Agents Work (End‑to‑End)

  1. 🎭 Planner β€” explores your app and creates human-readable test plans saved in specs/ directory.
  2. 🎭 Generator β€” transforms Markdown plans into executable Playwright tests in tests/ directory.
  3. 🎭 Healer β€” automatically repairs failing tests by updating selectors and waits.
  4. Execution β€” run generated tests with npx playwright test.
  5. Maintenance β€” Healer fixes issues automatically, keeping tests stable over time.
playwright Agent Test Example - PhatLT> npx playwright test tests/seed-agents.spec.ts

Running 1 test using 1 worker

  βœ“ [chromium] β€Ί tests/seed-agents.spec.ts β€Ί seed (2.1s)

  1 passed (2.1s)

playwright Agent Test Example - PhatLT> npx playwright test tests/google-search-generated.spec.ts

Running 5 tests using 1 worker

  βœ“ [chromium] β€Ί tests/google-search-generated.spec.ts β€Ί Google Search - Basic Operations β€Ί Perform Basic Search (3.2s)
  βœ“ [chromium] β€Ί tests/google-search-generated.spec.ts β€Ί Google Search - Basic Operations β€Ί Verify Search Box Functionality (1.8s)
  βœ“ [chromium] β€Ί tests/google-search-generated.spec.ts β€Ί Google Search - Basic Operations β€Ί Search with Empty Query (1.5s)
  βœ“ [chromium] β€Ί tests/google-search-generated.spec.ts β€Ί Google Search - Results Validation β€Ί Verify Search Results Display (4.1s)
  βœ“ [chromium] β€Ί tests/google-search-generated.spec.ts β€Ί Google Search - Results Validation β€Ί Navigate Through Search Results (5.3s)

  5 passed (16.0s)

6. How Playwright Agents Work

Playwright Agents follow a structured workflow as described in the official documentation. The process involves three main agents working together:

🎭 Planner Agent

The Planner explores your application and creates human-readable test plans:

  • Input: Clear request (e.g., “Generate a plan for guest checkout”), seed test, optional PRD
  • Output: Markdown test plan saved as specs/basic-operations.md
  • Process: Runs seed test to understand app structure and creates comprehensive test scenarios

🎭 Generator Agent

The Generator transforms Markdown plans into executable Playwright tests:

  • Input: Markdown plan from specs/
  • Output: Test suite under tests/
  • Process: Verifies selectors and assertions live, generates robust test code

🎭 Healer Agent

The Healer automatically repairs failing tests:

  • Input: Failing test name
  • Output: Passing test or skipped test if functionality is broken
  • Process: Replays failing steps, inspects UI, suggests patches, re-runs until passing
// Example: Generated test from specs/basic-operations.md
// spec: specs/basic-operations.md
// seed: tests/seed.spec.ts

import { test, expect } from '../fixtures';

test.describe('Adding New Todos', () => {
  test('Add Valid Todo', async ({ page }) => {
    // 1. Click in the "What needs to be done?" input field
    const todoInput = page.getByRole('textbox', { name: 'What needs to be done?' });
    await todoInput.click();

    // 2. Type "Buy groceries"
    await todoInput.fill('Buy groceries');

    // 3. Press Enter key
    await todoInput.press('Enter');

    // Expected Results:
    // - Todo appears in the list with unchecked checkbox
    await expect(page.getByText('Buy groceries')).toBeVisible();
    const todoCheckbox = page.getByRole('checkbox', { name: 'Toggle Todo' });
    await expect(todoCheckbox).toBeVisible();
    await expect(todoCheckbox).not.toBeChecked();

    // - Counter shows "1 item left"
    await expect(page.getByText('1 item left')).toBeVisible();

    // - Input field is cleared and ready for next entry
    await expect(todoInput).toHaveValue('');
    await expect(todoInput).toBeFocused();

    // - Todo list controls become visible
    await expect(page.getByRole('checkbox', { name: '❯Mark all as complete' })).toBeVisible();
  });
});

7. Agent Deep Dives

🎭 Planner β€” author plans that generate great tests

  • Goal: Convert product intent into executable, atomic scenarios.
  • Inputs: business request, seed.spec.ts, optional PRD/acceptance criteria.
  • Output quality tips: prefer user‑intent over UI steps, keep 1 scenario = 1 assertion focus, name entities consistently.
  • Anti‑patterns: mixing setup/teardown into steps; over‑specifying selectors in Markdown.

🎭 Generator β€” compile plans into resilient tests

  • Validates selectors live: uses your running app to confirm locators/assertions.
  • Structure: mirrors specs/*.md; adds fixtures from seed.spec.ts; keeps tests idempotent.
  • Resilience: prefer roles/labels; avoid brittle CSS/XPath; centralize waits.

🎭 Healer β€” stabilize and protect correctness

  • Scope: flaky selectors, timing, deterministic data; not business‑logic rewrites.
  • Review gates: patches proposed as diffs; you accept/reject before merge.
  • Outcomes: test fixed, or skipped with a documented reason when the feature is broken.

8. Project Structure and Artifacts

Playwright Agents follow a structured approach as described in the official documentation. The generated files follow a simple, auditable structure:

repo/
  .github/                    # agent definitions
    planner.md               # planner agent instructions
    generator.md             # generator agent instructions  
    healer.md                # healer agent instructions
  specs/                     # human-readable test plans
    basic-operations.md      # generated by planner
  tests/                     # generated Playwright tests
    seed.spec.ts             # seed test for environment
    add-valid-todo.spec.ts   # generated by generator
  playwright.config.ts       # Playwright configuration

Agent Definitions (.github/)

Under the hood, agent definitions are collections of instructions and MCP tools provided by Playwright. They should be regenerated whenever Playwright is updated:

# Initialize agent definitions
npx playwright init-agents --loop=vscode
npx playwright init-agents --loop=claude  
npx playwright init-agents --loop=opencode

Specs in specs/

Specs are structured plans describing scenarios in human-readable terms. They include steps, expected outcomes, and data. Specs can start from scratch or extend a seed test.

Tests in tests/

Generated Playwright tests, aligned one-to-one with specs wherever feasible. Generated tests may include initial errors that can be healed automatically by the healer agent.

Seed tests (seed.spec.ts)

Seed tests provide a ready-to-use page context to bootstrap execution. The planner runs this test to execute all initialization necessary for your tests including global setup, project dependencies, and fixtures.

// Example: seed.spec.ts
import { test, expect } from './fixtures';

test('seed', async ({ page }) => {
  // This test uses custom fixtures from ./fixtures
  // 🎭 Planner will run this test to execute all initialization
  // necessary for your tests including global setup, 
  // project dependencies and all necessary fixtures and hooks
});

9. Examples from Official Documentation

🎭 Planner Output Example

The 🎭 Planner generates human-readable test plans saved as specs/basic-operations.md:

# TodoMVC Application - Basic Operations Test Plan

## Application Overview

The TodoMVC application is a React-based todo list manager that demonstrates 
standard todo application functionality. Key features include:

- **Task Management**: Add, edit, complete, and delete individual todos
- **Bulk Operations**: Mark all todos as complete/incomplete and clear all completed todos  
- **Filtering System**: View todos by All, Active, or Completed status with URL routing support
- **Real-time Counter**: Display of active (incomplete) todo count
- **Interactive UI**: Hover states, edit-in-place functionality, and responsive design

## Test Scenarios

### 1. Adding New Todos

**Seed:** `tests/seed.spec.ts`

#### 1.1 Add Valid Todo

**Steps:**
1. Click in the "What needs to be done?" input field
2. Type "Buy groceries"
3. Press Enter key

**Expected Results:**
- Todo appears in the list with unchecked checkbox
- Counter shows "1 item left"
- Input field is cleared and ready for next entry
- Todo list controls become visible (Mark all as complete checkbox)

🎭 Generator Output Example

The 🎭 Generator transforms the Markdown plan into executable Playwright tests:

// Generated test from specs/basic-operations.md
// spec: specs/basic-operations.md
// seed: tests/seed.spec.ts

import { test, expect } from '../fixtures';

test.describe('Adding New Todos', () => {
  test('Add Valid Todo', async ({ page }) => {
    // 1. Click in the "What needs to be done?" input field
    const todoInput = page.getByRole('textbox', { name: 'What needs to be done?' });
    await todoInput.click();

    // 2. Type "Buy groceries"
    await todoInput.fill('Buy groceries');

    // 3. Press Enter key
    await todoInput.press('Enter');

    // Expected Results:
    // - Todo appears in the list with unchecked checkbox
    await expect(page.getByText('Buy groceries')).toBeVisible();
    const todoCheckbox = page.getByRole('checkbox', { name: 'Toggle Todo' });
    await expect(todoCheckbox).toBeVisible();
    await expect(todoCheckbox).not.toBeChecked();

    // - Counter shows "1 item left"
    await expect(page.getByText('1 item left')).toBeVisible();

    // - Input field is cleared and ready for next entry
    await expect(todoInput).toHaveValue('');
    await expect(todoInput).toBeFocused();

    // - Todo list controls become visible
    await expect(page.getByRole('checkbox', { name: '❯Mark all as complete' })).toBeVisible();
  });
});

10. Best Practices

  • Keep plans atomic: Small, focused scenarios help 🎭 Generator produce clean tests. Avoid mixing multiple user flows in one scenario.
  • Stabilize with seed: Centralize navigation, authentication, and data seeding in seed.spec.ts to ensure consistent test environment.
  • Prefer semantic selectors: Use getByRole, getByLabel, and getByText for resilient element selection.
  • 🎭 Healer guardrails: Review patches carefully; accept locator/wait tweaks, but avoid broad logic changes that might mask real bugs.
  • Version agent definitions: Commit .github/ changes and regenerate them whenever Playwright is updated.
  • Choose the right AI assistant: VS Code, Claude Code, or OpenCode β€” pick the one that fits your team’s workflow and preferences.
  • Maintain traceability: Keep clear 1:1 mapping from specs/*.md to tests/*.spec.ts using comments and headers.
  • Test the agents: Start with simple scenarios to understand how each agent works before tackling complex user flows.

11. Troubleshooting

🎭 Planner can’t explore the app

Ensure your app is running locally, seed test works, and the app is accessible. Check that authentication and navigation are properly set up in seed.spec.ts.

🎭 Generator can’t find elements

Run the app locally, ensure routes are correct, and verify that elements have proper roles, labels, or accessible names. The 🎭 Generator validates selectors live against your running app.

🎭 Healer loops without fixing

Set explicit timeouts, add deterministic test data, and reduce flakiness in network waits. The 🎭 Healer works best with stable, predictable test conditions.

AI assistant doesn’t trigger agents

Re-run npx playwright init-agents --loop=[assistant], reload the IDE, and ensure the correct workspace root is open with agent definitions in .github/.

Generated tests fail immediately

Check that your seed test passes first. Ensure the app state matches what the 🎭 Planner observed. Verify that test data and authentication are consistent between planning and execution.

Agent definitions are outdated

Regenerate agent definitions after Playwright updates: npx playwright init-agents --loop=[assistant]. This ensures you have the latest tools and instructions.

12. CI/CD Integration

You can run the same agent‑generated tests in CI. Keep agent definitions in the repo and refresh them on Playwright upgrades.

# .github/workflows/tests.yml (excerpt)
name: Playwright Tests
on: [push, pull_request]
jobs:
  test:
    runs-on: ubuntu-latest
    steps:
      - uses: actions/checkout@v4
      - uses: actions/setup-node@v4
        with:
          node-version: 20
      - run: npm ci
      - run: npx playwright install --with-deps
      - run: npx playwright test --reporter=html

13. FAQ

Do I need Claude Code?

No. Playwright Agents work with VS Code (v1.105+), Claude Code, or OpenCode. Choose the AI assistant that fits your team’s workflow and preferences.

Where do test plans live?

In specs/ as Markdown files generated by the 🎭 Planner. Generated tests go to tests/.

What if a feature is actually broken?

The 🎭 Healer can skip tests with an explanation instead of masking a real bug. It distinguishes between flaky tests and genuinely broken functionality.

Can I run agent-generated tests in CI?

Yes. The agents produce standard Playwright tests that run with npx playwright test in CI. Agent definitions are only needed for test authoring, not execution.

How do I update agent definitions?

Run npx playwright init-agents --loop=[assistant] whenever Playwright is updated to get the latest tools and instructions.

What’s the difference between 🎭 Planner, 🎭 Generator, and 🎭 Healer?

🎭 Planner: Explores your app and creates human-readable test plans. 🎭 Generator: Transforms plans into executable Playwright tests. 🎭 Healer: Automatically fixes failing tests by updating selectors and waits.

14. Demo video and Source code

GitHubGitHub repository: phatltscuti/playwright_agents


Revolutionizing Test Automation with Playwright Agents


🎭 Revolutionizing Test Automation with Playwright Agents

How AI-Powered Agents are Transforming E2E Testing

πŸ“… October 2025
⏱️ 5 min read
🏷️ Testing, AI, Automation

Imagine this: You describe what you want to test, and AI generates comprehensive test plans, writes the actual test code, and even fixes failing tests automatically. This isn’t science fictionβ€”it’s Playwright Agents, and it’s available today.

Playwright has introduced three powerful AI agents that work together to revolutionize how we approach test automation: the Planner, Generator, and Healer. Let’s dive deep into how these agents are changing the game.

What Are Playwright Agents?

Playwright Agents are AI-powered tools that automate the entire test creation and maintenance lifecycle. They can work independently or sequentially in an agentic loop, producing comprehensive test coverage for your product without the traditional manual overhead.

🎯

Planner Agent

The Planner is your AI test strategist. It explores your application and produces detailed, human-readable test plans in Markdown format.

How It Works:

  • Input: A clear request (e.g., “Generate a plan for guest checkout”), a seed test that sets up your environment, and optionally a Product Requirements Document
  • Process: Runs the seed test to understand your app’s structure, analyzes user flows, and identifies test scenarios
  • Output: Structured Markdown test plans saved in specs/ directory with detailed steps and expected results
πŸ’‘ Pro Tip: The Planner uses your seed test as context, so it understands your custom fixtures, authentication flows, and project setup automatically!

Example Output:

# TodoMVC Application - Basic Operations Test Plan

## Test Scenarios

### 1. Adding New Todos
#### 1.1 Add Valid Todo
**Steps:**
1. Click in the "What needs to be done?" input field
2. Type "Buy groceries"
3. Press Enter key

**Expected Results:**
- Todo appears in the list with unchecked checkbox
- Counter shows "1 item left"
- Input field is cleared and ready for next entry

⚑

Generator Agent

The Generator transforms your human-readable test plans into executable Playwright test code, verifying selectors and assertions in real-time.

Key Features:

  • Live Verification: Checks selectors against your actual app while generating code
  • Smart Assertions: Uses Playwright’s catalog of assertions for robust validation
  • Context Aware: Inherits setup from seed tests and maintains consistency
  • Best Practices: Generates code following Playwright conventions and modern patterns

Generated Test Example:

// spec: specs/basic-operations.md
// seed: tests/seed.spec.ts
import { test, expect } from '../fixtures';

test.describe('Adding New Todos', () => {
  test('Add Valid Todo', async ({ page }) => {
    // Type and submit todo
    const todoInput = page.getByRole('textbox', { 
      name: 'What needs to be done?' 
    });
    await todoInput.fill('Buy groceries');
    await todoInput.press('Enter');
    
    // Verify todo appears
    await expect(page.getByText('Buy groceries')).toBeVisible();
    await expect(page.getByText('1 item left')).toBeVisible();
    await expect(todoInput).toHaveValue('');
  });
});

πŸ”§

Healer Agent

The Healer is your automated maintenance engineer. When tests fail, it diagnoses issues and applies fixes automatically.

Healing Process:

  • Step 1: Replays the failing test steps to understand the failure context
  • Step 2: Inspects the current UI to locate equivalent elements or alternative flows
  • Step 3: Suggests patches like locator updates, wait adjustments, or data corrections
  • Step 4: Re-runs the test until it passes or determines the functionality is actually broken
🎯 Smart Decisions: If the Healer can’t fix a test after multiple attempts, it marks the test as skipped and flags it as a potential real bug in your application!

Common Fixes Applied:

  • Updating selectors when UI structure changes
  • Adding appropriate waits for dynamic content
  • Adjusting test data to match new requirements
  • Handling new dialog boxes or pop-ups

πŸ€– Working with Claude Code

Playwright Agents integrate seamlessly with Claude Code, enabling natural language test automation directly from your terminal.

Setup Process:

# Initialize Playwright Agents for Claude Code
npx playwright init-agents --loop=claude

# This generates agent definitions optimized for Claude Code
# under .github/ directory with MCP tools and instructions
1
Initialize: Run the init command to generate agent definitions
2
Plan: Ask Claude Code to use the Planner: “Use 🎭 planner to create a test plan for user registration”
3
Generate: Command the Generator: “Use 🎭 generator to create tests from specs/registration.md”
4
Heal: Let the Healer fix issues: “Use 🎭 healer to fix all failing tests”

Benefits with Claude Code:

  • Natural Language Control: Command agents using simple English instructions
  • Context Awareness: Claude Code understands your project structure and requirements
  • Iterative Refinement: Easily adjust and improve tests through conversation
  • Automatic Updates: Regenerate agents when Playwright updates to get latest features

The Complete Workflow

Here’s how the three agents work together to create comprehensive test coverage:

1. 🎯 Planner explores your app
   └─> Produces: specs/user-flows.md

2. ⚑ Generator reads the plan
   └─> Produces: tests/user-registration.spec.ts
               tests/user-login.spec.ts
               tests/checkout.spec.ts

3. Run tests: npx playwright test
   └─> Some tests fail due to UI changes

4. πŸ”§ Healer analyzes failures
   └─> Updates selectors automatically
   └─> Tests now pass βœ…

Why This Matters

Traditional E2E testing requires significant manual effort:

  • Writing detailed test plans takes hours
  • Converting plans to code is tedious and error-prone
  • Maintaining tests as UI changes is a constant battle
  • New team members need extensive training

Playwright Agents eliminate these pain points by:

  • βœ… Generating plans in minutes instead of hours
  • βœ… Producing production-ready test code automatically
  • βœ… Self-healing tests that adapt to UI changes
  • βœ… Making test automation accessible to everyoneDEMO:

    Github source : https://github.com/cuongdvscuti/agent-playwright

Ready to Transform Your Testing?

Playwright Agents represent a fundamental shift in how we approach test automation. By combining AI with Playwright’s powerful testing capabilities, you can achieve comprehensive test coverage with a fraction of the traditional effort.

Whether you’re starting a new project or maintaining an existing test suite, Playwright Agents can help you move faster, catch more bugs, and spend less time on maintenance.

Get Started with Playwright Agents


Claude Code Plugins

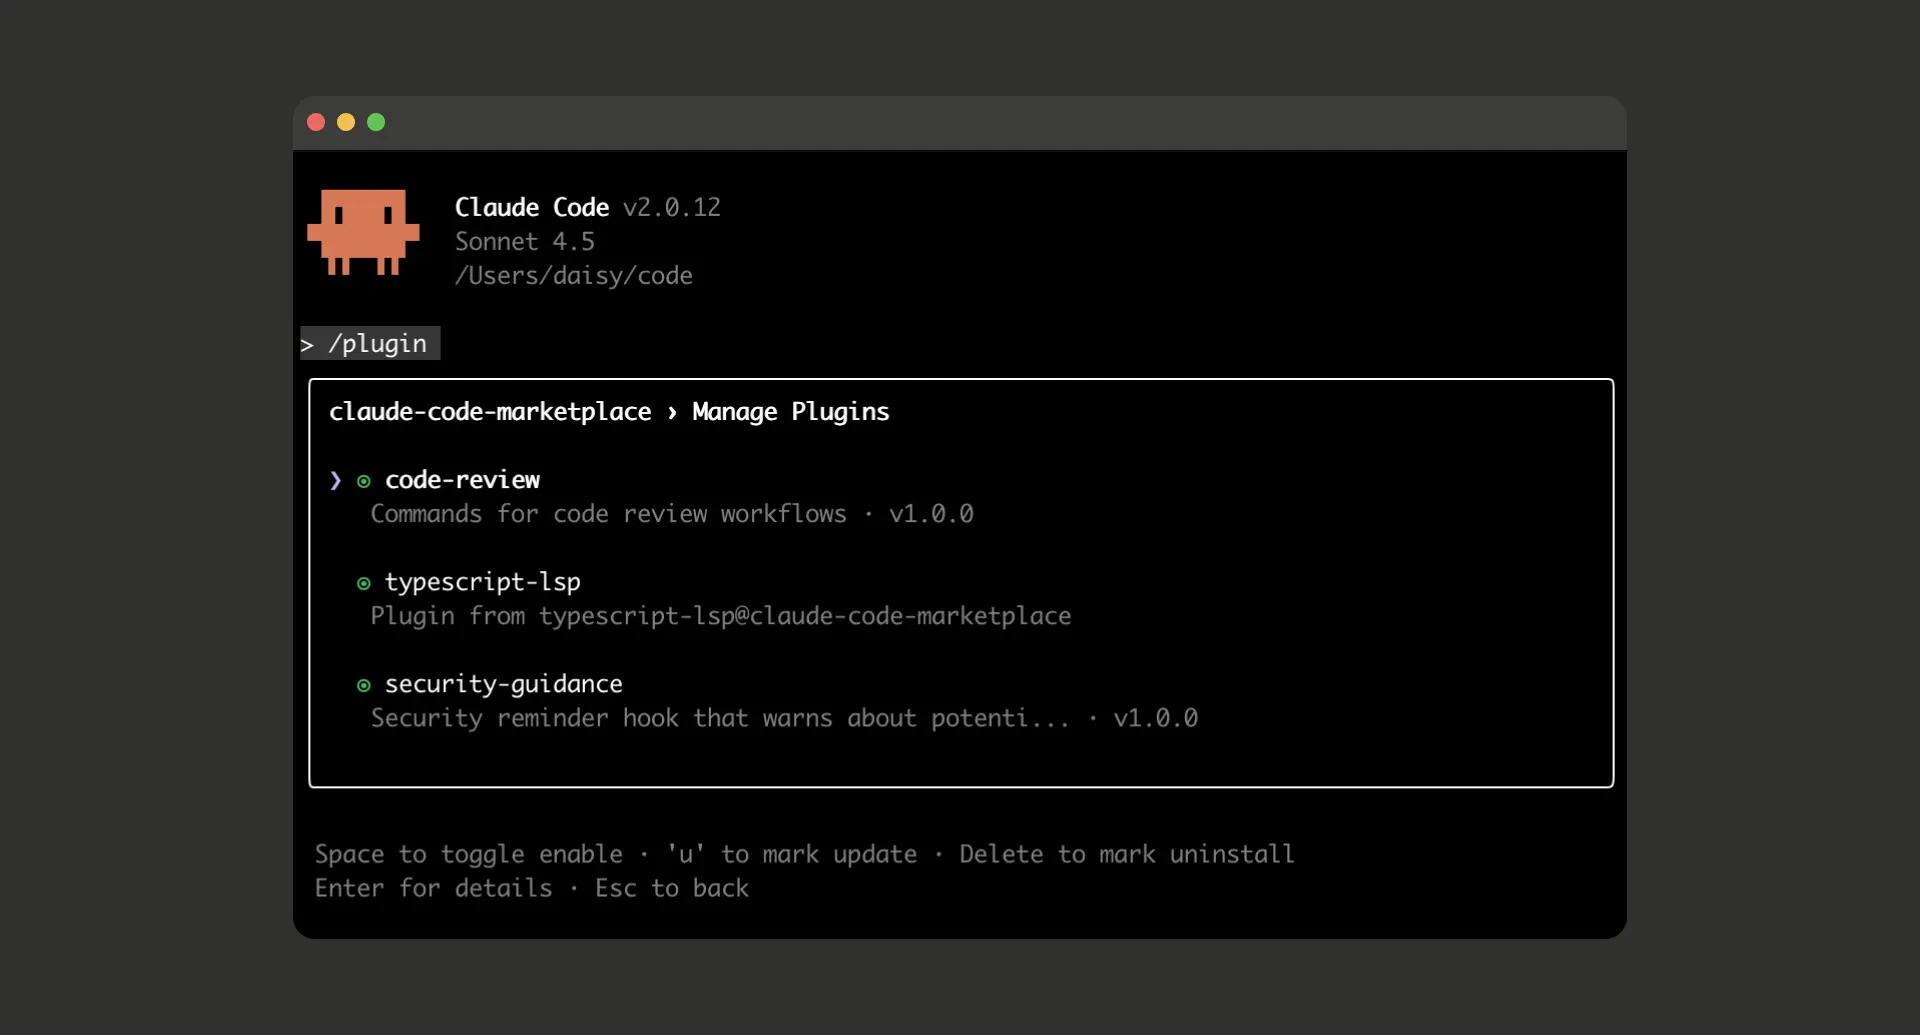
Introduction

Claude Code now supports plugins β€” modular extensions that let you customize and extend Claude Code’s capabilities by bundling slash commands, agents (subagents), Model Context Protocol (MCP) servers, and hooks.

Plugins provide a lightweight, shareable way to package workflows, integrations, and automation, so you and your team can standardize and reuse custom logic.

Features

Here are the main features and capabilities of Claude Code plugins:

  • Slash Commands: You can define custom commands (e.g. /hello, /format) to trigger specific behaviors or shortcuts.
  • Subagents / Agents: Plugins may include purpose-built agents for specialized tasks.
  • MCP Servers Integration: You can bundle MCP server definitions to connect Claude Code to external tools, services, or data sources.
  • Hooks / Event Handlers: Plugins can define hooks to run custom logic at key points in the workflow (e.g. on specific events).
  • Toggleable / Modular: You can enable or disable plugins to adjust Claude Code’s context footprint and reduce complexity when not needed.
  • Plugin Marketplaces: Plugins can be bundled into marketplaces (catalogs), making it easier for teams or the community to share and reuse plugin collections.
  • Team / Repository-level Plugins: You can declare in your project’s configuration which marketplaces and plugins should be used, so team members get consistent plugin setups.

Installation / Setup

Here’s a high-level guide on how to install and set up plugins in Claude Code:

Prerequisites

  • Claude Code must already be installed and running.
  • You should have basic command-line familiarity.

Basic Steps & Quickstart

Create a plugin (for developers):

  • Make a directory for the plugin, e.g. my-first-plugin, and inside it a .claude-plugin/plugin.json manifest that describes the plugin (name, version, author, description).
  • Optionally, add subdirectories for commands/, agents/, hooks/, etc., containing your plugin logic.
  • If you want to distribute, create a marketplace.json that references your plugin(s).

Install / enable plugins (as a user):

  • Inside Claude Code, use the /plugin command.
  • You may first add a marketplace, e.g.:
    /plugin marketplace add user-or-org/repo-name

    Then browse or install from that marketplace.

  • Or use direct install commands, for example:
    /plugin install my-plugin@marketplace-name

    You can also enable, disable, or uninstall as needed.

  • After installing a plugin, you may need to restart Claude Code to activate the new plugin.

Verify the installation:

  • Use /help to check if new slash commands or features appear.
  • Use /plugin β†’ β€œManage Plugins” to inspect installed plugins and see what they provide.

Team / Repository Plugin Setup:

In a project repo’s .claude/settings.json, you can declare which marketplaces and plugins should be used by all team members.
When users β€œtrust” the repo, Claude Code will auto-install those plugins.

Developing & testing locally:

  • Use a local β€œdevelopment marketplace” structure to test plugins in isolation.
  • Iterate: uninstall and reinstall the plugin after modifications to test changes.
  • Debug by checking directory structure, stepping through individual components, and using provided CLI debugging tools.

Demo (Example Walkthrough)

Here’s a simple example to illustrate how one might build, install, and test a minimal plugin for Claude Code.

Example: Greeting Plugin

Create plugin skeleton

test-marketplace/
  .claude-plugin/
    marketplace.json
  my-first-plugin/
    .claude-plugin/
      plugin.json
    commands/
      hello.md

plugin.json (inside my-first-plugin/.claude-plugin/):

{
  "name": "my-first-plugin",
  "description": "A simple greeting plugin to learn the basics",
  "version": "1.0.0",
  "author": {
    "name": "Your Name"
  }
}

commands/hello.md:

---
description: Greet the user with a personalized message
---

# Hello Command  
Greet the user warmly and ask how you can help them today. Make the greeting personal and encouraging.

marketplace.json (in test-marketplace/.claude-plugin/):

{
  "name": "test-marketplace",
  "owner": {
    "name": "Test User"
  },
  "plugins": [
    {
      "name": "my-first-plugin",
      "source": "./my-first-plugin",
      "description": "My first test plugin"
    }
  ]
}

Launch Claude Code & install plugin

cd test-marketplace
claude

Within Claude Code:

/plugin marketplace add ./test-marketplace
/plugin install my-first-plugin@test-marketplace

Select β€œInstall now” when prompted, and then restart Claude Code if needed.

Test the plugin

  • Run /hello β†’ you should see Claude respond using your greeting command.
  • Run /help β†’ the hello command should appear in the list.


References:
https://www.anthropic.com/news/claude-code-plugins
https://docs.claude.com/en/docs/claude-code/setup