1. Intro
Sending cold emails manually is slow and error-prone. But sending bulk emails without personalization feels like spam.
The solution?
👉 Build a simple mail merge system using Gmail + Google Sheets + Apps Script.
This approach allows you to:
- Personalize each email automatically
- Control exactly what gets sent
- Avoid expensive tools
- Stay compliant and safe
2. What You’ll Build
By the end of this guide, you will have:
- A structured Google Sheet (your data source)
- A reusable Gmail template (your message engine)
- A Google Apps Script (automation layer)
- A logging & safety system
Think of it like this:
Google Sheets (Data)
        ↓
Apps Script (Logic)
        ↓
Gmail (Send emails)
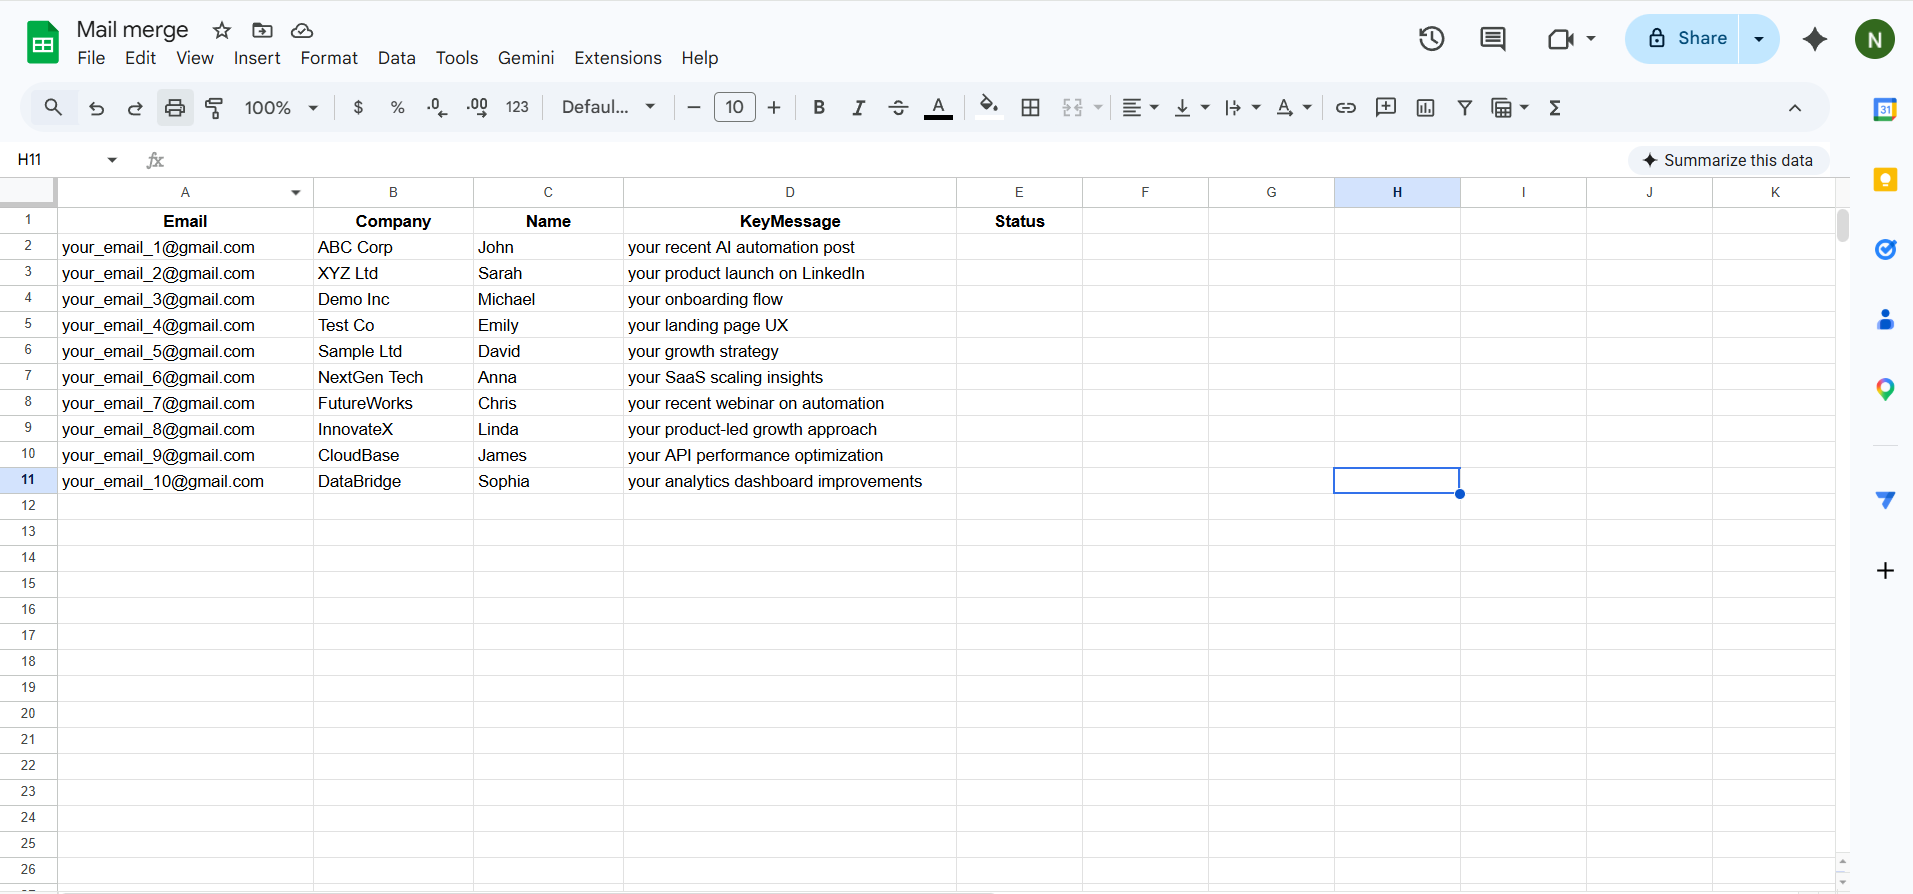
3. Create Your Google Sheet (Data Source)
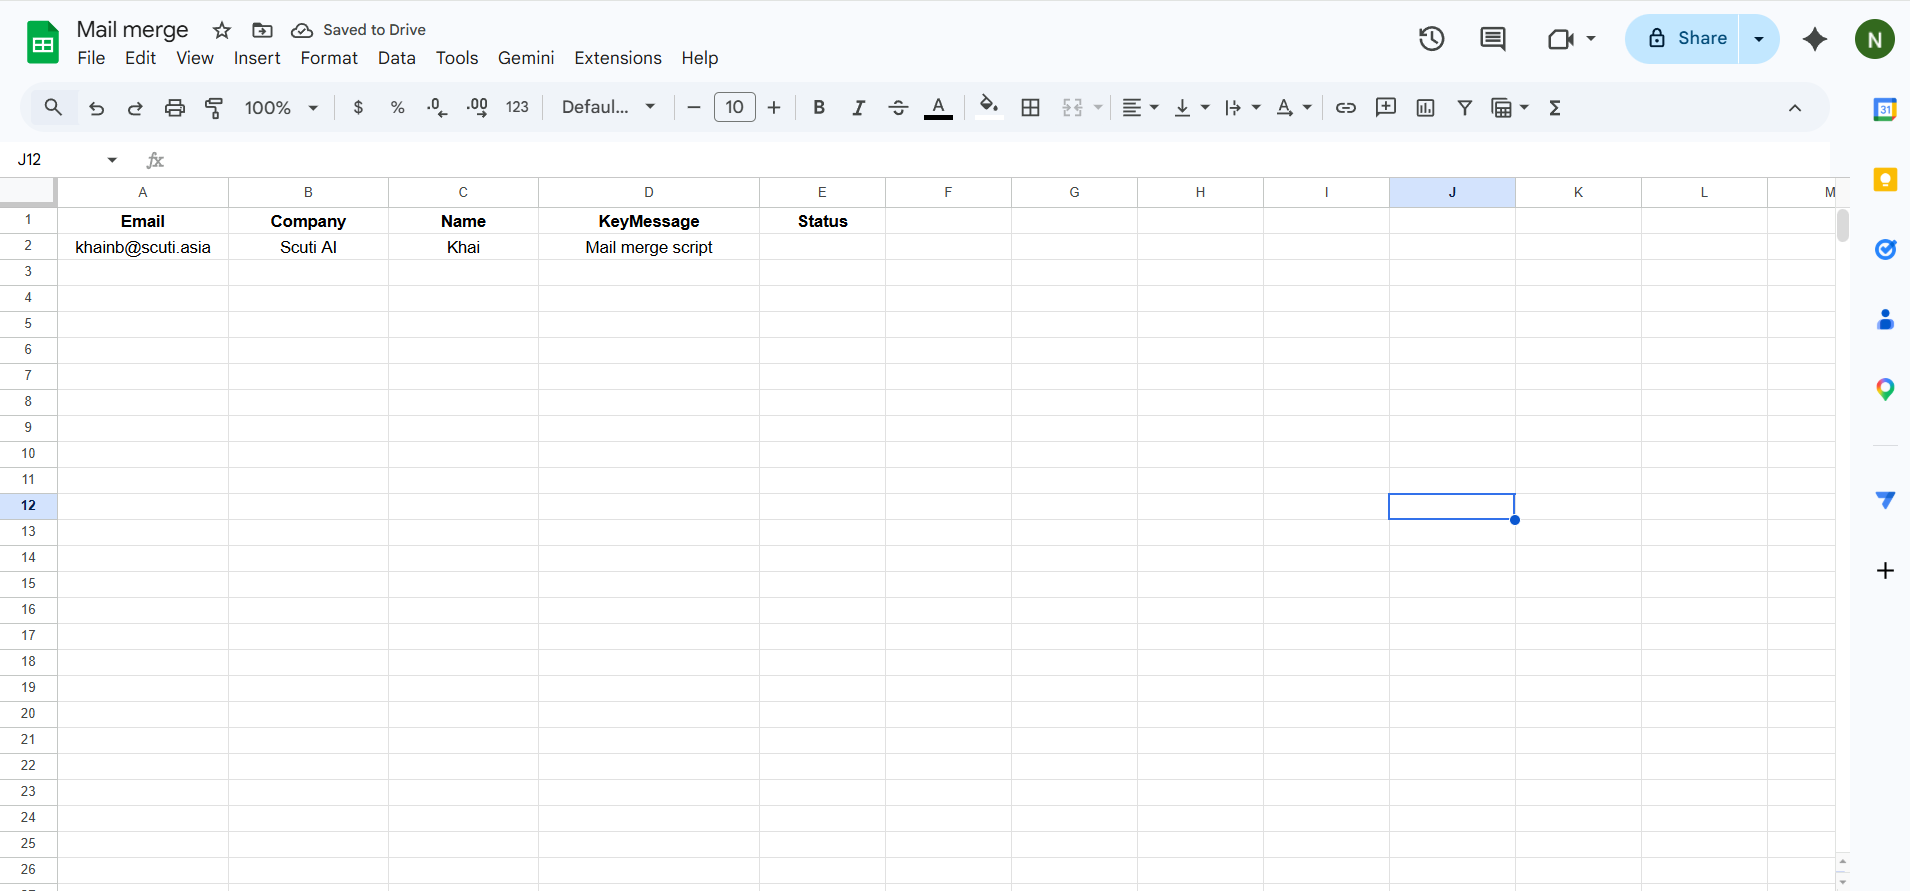
Your Google Sheet acts as the database for your email campaign.
3.1 Required Structure
| Company | Name | KeyMessage |
|---|
3.2 What Each Column Means
- Email → Recipient email address
- Company → Used for personalization
- Name → Greeting (Hi John)
- KeyMessage → The most important personalization
line - Status → Used for tracking (SENT / ERROR)
👉 This sheet is critical because:
- It replaces manual typing
- It ensures consistency
- It enables automation
4. Create Your Gmail Template (Message Engine)
Now you define what will be sent.
4.1 What is a Template?
A template is a draft email with placeholders.
Instead of writing 100 emails, you write 1 email, and the system fills in the details.
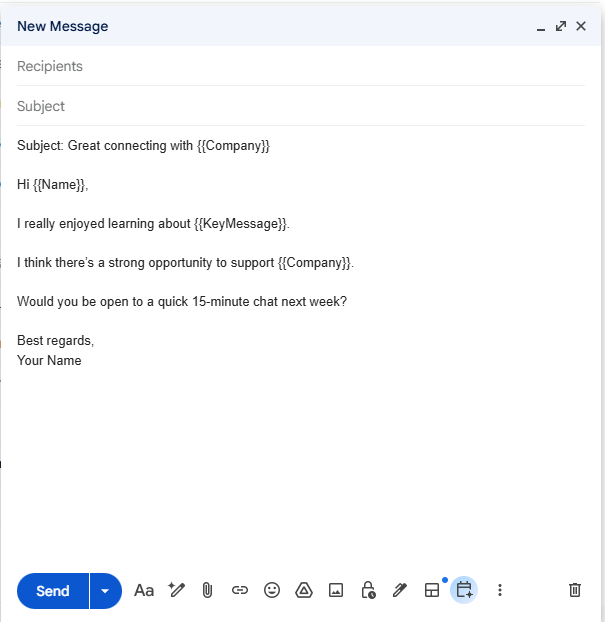
4.2 Example Template
Subject: Great connecting with {{Company}}

Hi {{Name}},

I really enjoyed learning about {{KeyMessage}}.

I think there’s a strong opportunity to support {{Company}}.

Would you be open to a quick 15-minute chat next week?

Best regards,
Your Name
4.3 How Placeholders Work
Each placeholder:
{{ColumnName}}👉 Maps directly to your Google Sheet
| Placeholder | Value |
|---|---|
| {{Name}} | John |
| {{Company}} | Scuti AI |
5. Add Apps Script (Automation Engine)
5.1 What is Google Apps Script?
Google Apps Script is a JavaScript-based automation tool built into Google Workspace.
👉 It allows you to:
- Read data from Google Sheets
- Modify content dynamically
- Send emails via Gmail automatically
Think of it as:
“The brain that connects your Sheet and Gmail”
5.2 What This Script Does (Conceptually)
- Read the data (Name, Email, etc.)
- Take your Gmail template
- Replace placeholders with real values
- Send the email
- Mark the row as SENT
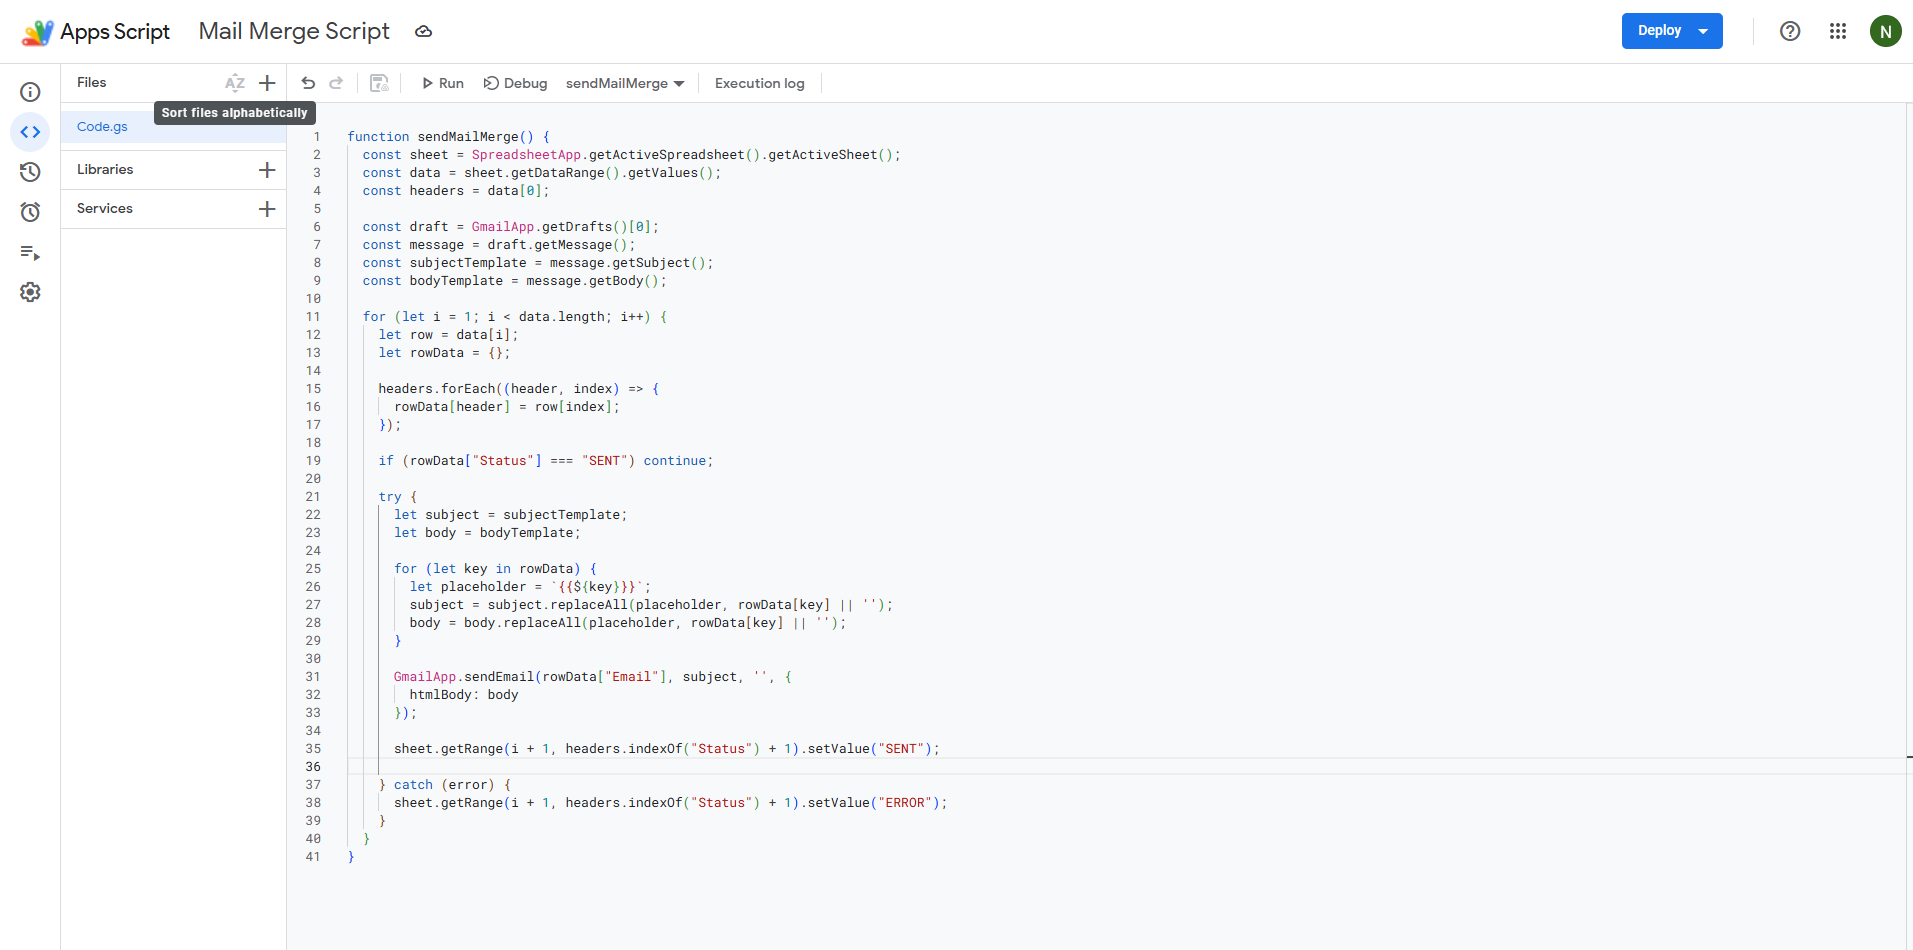
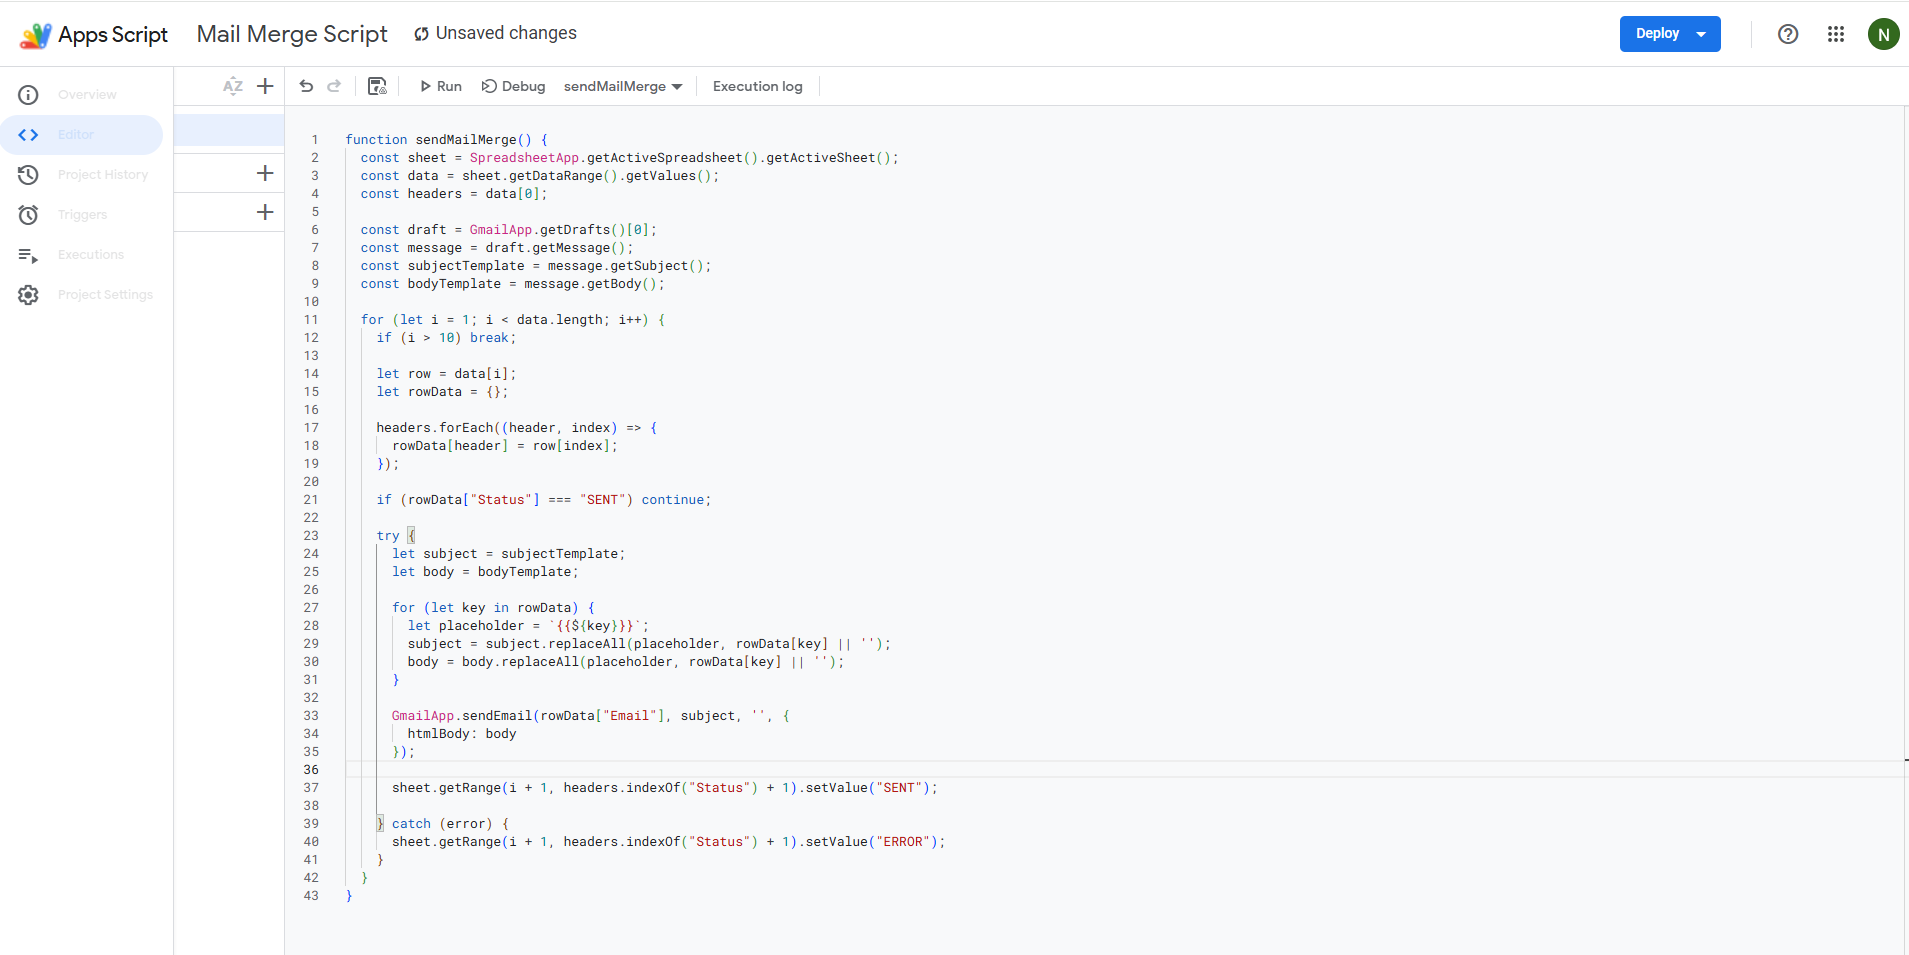
5.3 Full Script
function sendMailMerge() {
  const sheet = SpreadsheetApp.getActiveSpreadsheet().getActiveSheet();
  const data = sheet.getDataRange().getValues();
  const headers = data[0];

  const draft = GmailApp.getDrafts()[0];
  const message = draft.getMessage();
  const subjectTemplate = message.getSubject();
  const bodyTemplate = message.getBody();

  for (let i = 1; i < data.length; i++) {
    let row = data[i];
    let rowData = {};

    headers.forEach((header, index) => {
      rowData[header] = row[index];
    });

    if (rowData["Status"] === "SENT") continue;

    try {
      let subject = subjectTemplate;
      let body = bodyTemplate;

      for (let key in rowData) {
        let placeholder = `{{${key}}}`;
        subject = subject.replaceAll(placeholder, rowData[key] || '');
        body = body.replaceAll(placeholder, rowData[key] || '');
      }

      GmailApp.sendEmail(rowData["Email"], subject, '', {
        htmlBody: body
      });

      sheet.getRange(i + 1, headers.indexOf("Status") + 1).setValue("SENT");

    } catch (error) {
      sheet.getRange(i + 1, headers.indexOf("Status") + 1).setValue("ERROR");
    }
  }
}
5.4 Line-by-Line Explanation
- Read sheet: Get all data including headers
- Extract headers: Map column names to values
- Get draft: Use Gmail draft as template
- Loop rows: Process each recipient
- Replace placeholders: Convert {{Name}} → John
- Send email: Execute Gmail sending
- Logging: Mark as SENT
6. Test with multiple Rows
Before sending emails to real prospects, you must test your system carefully.
This step ensures that:
- Personalization works correctly
- No placeholders are broken
- Emails look natural and professional
🔹 Step 1: Prepare Test Data in Google Sheets
In your Google Sheet, create 5–10 test rows.
👉 Example:
| Company | Name | KeyMessage | |
|---|---|---|---|
| [email protected] | ABC Corp | John | your AI automation post |
| [email protected] | XYZ Ltd | Sarah | your product launch |
| [email protected] | Demo Inc | Michael | your onboarding flow |
✅ Important:
- Use your own email addresses only
- Do NOT use real customer emails
You can use Gmail alias:
[email protected]
[email protected]
👉 All emails will go to the same inbox
🔹 Step 2: Double-Check Your Template
Before running the script:
- Open your Gmail Draft
- Check all placeholders:
{{Name}}
{{Company}}
{{KeyMessage}}
⚠️ Make sure:
- No typo in placeholder names
- Must match column names in Sheet exactly
🔹 Step 3: Limit Sending to 10 Rows (Safety Step)
To avoid accidental mass sending, add this line in your script:
if (i > 10) break;👉 This ensures:
- Only first 10 rows are processed
- You stay within safe testing limits
🔹 Step 4: Run the Script
Go to Apps Script:
- Select function: sendMailMerge
- Click Run (▶️)
👉 Wait a few seconds for execution
🔹 Step 5: Check Google Sheet Status
Go back to your Google Sheet and check the Status column:
| Status | Meaning |
|---|---|
| SENT | Email sent successfully |
| ERROR | Something went wrong |
🔹 Step 6: Verify Emails in Inbox
Open your email inbox and check:
✅ What to verify:
- Personalization:
Hi John
- No broken placeholders:
❌ Hi {{Name}}
- Content looks natural
- Formatting is correct
7. Operational Controls
7.1 Send Limits
- Gmail free: ~100–150/day
- Workspace: up to 1,500/day
7.2 Opt-Out Line
Let me know if you'd prefer not to receive emails like this.
7.3 Error Handling
catch (error)
7.4 Logging
- Status column
- Optional: Timestamp, Gmail label
8. Quality Control Checklist
- ✔ Real personalization
- ✔ No fake claims
- ✔ Clean formatting
- ✔ Tested
- ✔ Opt-out included
9. Demo
10. Final Thoughts
This system is simple but powerful.
- Control everything
- Understand the logic
- Customize infinitely