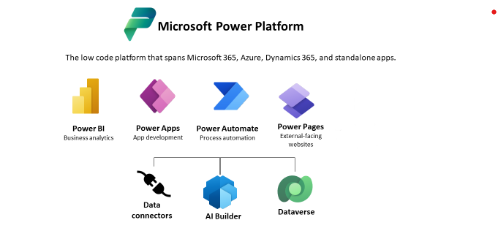
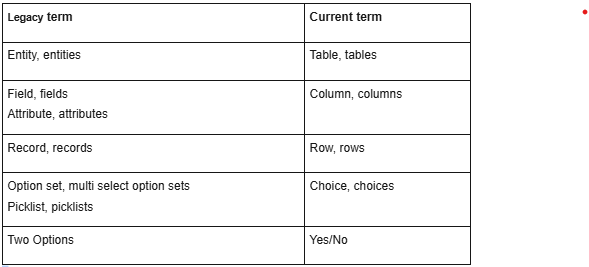
Dataverse lets you securely store and manage data that’s used by business applications. Data within Dataverse is stored within a set of tables. A table is a set of rows (formerly referred to as records) and columns (formerly referred to as fields/attributes). Each column in the table is designed to store a certain type of data, for example, name, age, salary, and so on. Dataverse includes a base set of standard tables that cover typical scenarios, but you can also create custom tables specific to your organization and populate them with data by using Power Query. App makers can then use Power Apps to build rich applications that use this data.
Why use Dataverse?
Standard and custom tables within Dataverse provide a secure and cloud-based storage option for your data. Tables let you create a business-focused definition of your organization’s data for use within apps. If you’re not sure whether tables are your best option, consider these benefits:
- Easy to manage – Both the metadata and data are stored in the cloud. You don’t need to worry about the details of how they’re stored.
- Easy to secure – Data is securely stored so that users can see it only if you grant them access. Role-based security allows you to control access to tables for different users within your organization.
- Access your Dynamics 365 Data – Data from your Dynamics 365 applications is also stored within Dataverse, allowing you to quickly build apps that use your Dynamics 365 data and extend your apps with Power Apps.
- Rich metadata – Data types and relationships are used directly within Power Apps.
- Logic and validation – Define calculated columns, business rules, workflows, and business process flows to ensure data quality and drive business processes.
- Productivity tools – Tables are available within the add-ins for Microsoft Excel to increase productivity and ensure data accessibility.
Terminology updates
Responding to customer feedback and data from user research, effective November 2020 we’re updating some terminology in Dataverse to be more intuitive and make its usage more productive. The terminology updates are listed below, and we’re in the process of rolling them out across Microsoft Power Platform.
Dynamics 365 and Dataverse
Dynamics 365 applications—such as Dynamics 365 Sales, Dynamics 365 Customer Service, or Dynamics 365 Talent—also use Dataverse to store and secure the data they use. This enables you to build apps by using Power Apps and Dataverse directly against your core business data, which is already used within Dynamics 365, without the need for integration.
- Build apps against your Dynamics 365 data – Build apps quickly against your business data within Power Apps or by using the extensible platform that lets pro developers programmatically interact with data and metadata, apply business logic, create custom connectors, and integrate with external data.
- Manage reusable business logic and rules – Business rules and logic already defined in your Dataverse tables are applied to apps created with Power Apps to ensure data consistency, regardless of how your users access the data or which app they use.
- Reusable skills across Dynamics 365 and Power Apps – Users who are skilled in Power Apps or Dynamics 365 can now take advantage of those skills across the Dataverse platform. Creating tables, forms, and charts are now common tasks you perform across your applications.
Integrating data into Dataverse
Building an app typically involves data from more than one source. Although this can sometimes be done at the application level, there are cases where integrating this data into a common store allows for an easier app-building experience and a single set of logic to maintain and operate over the data. Dataverse allows data to be integrated from multiple sources into a single store, which can then be used in Power Apps, Power Automate, and Power BI along with data that’s already available from the Dynamics 365 applications.
- Scheduled integration with other systems – Data that’s kept within another application can be regularly synchronized with Dataverse to allow you to take advantage of data from other applications in Power Apps.
- Transform and import data using Power Query – Transforming data when importing into Dataverse can be done through Power Query—a tool commonly used across Excel and Power BI—from many online data sources.
- One-time import of data – Simple import and export of Excel and CSV files can be used for a one-time (or infrequent) import of data into Dataverse.
Logic and validation
Tables within Dataverse can take advantage of rich server-side logic and validation to ensure data quality and reduce repetitive code in each app that creates and uses data within a table.
- Business rules validate data across multiple columns and tables, and provide warning and error messages, regardless of the app used to create the data. More information: Create a business rule
- Business process flows guide users to ensure they enter data consistently and follow the same steps every time. Business process flows are currently only supported for model-driven apps. More information: Business process flows overview
- Workflows allow you to automate business processes without user interaction. More information: Workflows overview
- Business logic with code supports advanced developer scenarios to extend the application directly through code. More information: Apply business logic with code
Create a canvas app from scratch using Microsoft Dataverse
Open a blank app
To create an app from scratch that uses data from Dataverse, the first step is to create a blank app. For this exercise, when you create the blank app, ensure you choose Phone format.
Specify a table
- In the middle of the screen, select connect to data.
- In the app authoring menu, select Data. If this is your first time, you’re prompted to create a connection to Dataverse. Select Create this connection.
- Select Add data and in the search box enter, Accounts > Connect.
- Close the Data pane by selecting the close icon in the upper-right corner.
Add a list screen
- On the command bar, select New screen > Templates tab > List.
- In the left navigation bar, select BrowseGallery1, and then set the value of the Items property to this formula:
SortByColumns(Search(Accounts, TextSearchBox1.Text, “name”), “name”, If(SortDescending1, SortOrder.Descending, SortOrder.Ascending))
This formula specifies that:
・The gallery should show data from the Accounts table.
・The data should be sorted in ascending order until a user selects the sort button to toggle the sort order.
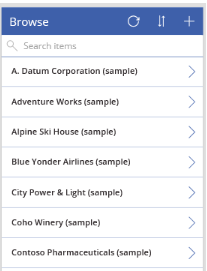
・If a user types or pastes one or more characters into the search bar (TextSearchBox1), the list will show only those accounts for which the name field contains the characters that the user specified.
You can use these and many other functions to specify how your app appears and behaves.

3. Set the gallery’s layout to show only the name of each account, and configure the title bar to show the word Browse, as Customize a gallery describes.
4. In the left app authoring pane, hover over Screen1, select the ellipsis icon (…), and then select Delete.
5. In the left app authoring pane, hover over Screen2, select the ellipsis icon (…), and then select Rename.
6. Type or paste BrowseScreen, and then rename the gallery in that screen as BrowseGallery.

Add a form screen
- Repeat the first step of the previous procedure, except add a Form screen instead of a List screen.
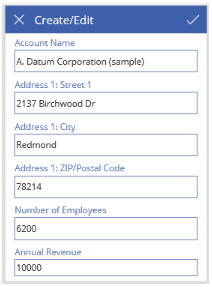
- Set the form’s DataSource property to Accounts and its Item property to BrowseGallery.Selected, as the Advanced tab of the right-hand pane shows.
- On the Properties tab of the right-hand pane, select Edit Fields to open the Fields pane.
- Select Add field, and then select the check boxes for these fields:
・Address 1: Street 1
・Address 1: City
・Address 1: ZIP/Postal code
・Number of Employees
・Annual Revenue
・Account Name - Note
Outside of this scenario, you can create a custom field by selecting New field, providing the required information, and then selecting Done. More information: Create a column.

6. Select Add.
7.Set the title bar’s Text property to show Create/Edit.
The screen reflects your changes.
8. Rename this screen FormScreen.
Configure icons
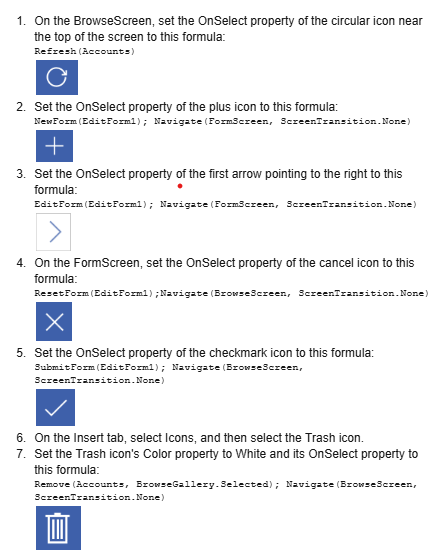
Test the app
On the actions menu, select Preview the app. More information: Preview an app
Toggle the list between ascending and descending sort orders, and filter the list by one or more characters in the account name.
Add an account, edit the account that you added, start to update the account but cancel your changes, and then delete the account.
