
Introduction
Google Stitch is Google’s new AI-powered interface design tool that helps users quickly create mockups and prototypes for web/mobile applications. With AI assistance, even those without a design background can create professional interfaces.
In this article, we’ll walk through creating a B2B System Management screen from start to finish using Google Stitch.
1. Preparation Before Starting
Requirements
- Google account (to access Stitch)
- Modern web browser (Chrome, Edge, Firefox)
- Stable internet connection
Accessing Google Stitch
- Navigate to: stitch.google.com
- Sign in with your Google account
- Wait for your personal workspace to load
2. Creating a New Project
Step 2.1: Initialize project
- On the main screen, click “New Project”
- Name your project:
B2B System Management - Select template: Blank Canvas
- Click “Create” to continue
Step 2.2: Canvas setup
- Canvas size: 1920×1080 (Desktop HD)
- Grid: Enable grid display with 8px spacing
- Snap to grid: Enable for automatic element alignment
3. Designing Layout Structure
Insert prompt :
# B2B System Management Screen Mockup
## 1. Overview
This screen is designed for administrators to manage companies, users, and system status in a B2B platform.
—
## 2. Layout Structure
“`
+————————————————————-+
| Header |
| Logo | System Name | Notifications | User Profile |
+———————-+————————————–+
| Sidebar | Main Content |
|———————-|————————————–|
| – Dashboard | [Page Title: Company Management] |
| – Companies |————————————–|
| – Users | Filters Section |
| – Contracts | [Search] [Status] [Type] [Date] |
| – Reports |————————————–|
| – Settings | Table Section |
| |————————————–|
| | Company | Type | Status | Created At |
| |————————————–|
| | ABC Ltd | Vendor | Active | 2026-01 |
| | XYZ Inc | Client | Pending| 2026-02 |
| | … |
| |————————————–|
| | Pagination |
| | [Prev] 1 2 3 … [Next] |
| |————————————–|
| | Action Buttons |
| | [Create New] [Export CSV] |
+———————-+————————————–+
“`
—
## 3. Components Detail
### Header
* Logo + System Name (left)
* Notification icon (bell)
* User profile dropdown (avatar, logout, settings)
### Sidebar
* Vertical navigation menu
* Highlight active menu (e.g., “Companies”)
### Filters Section
* Search input (by company name/email)
* Dropdown filters:
* Status (Active, Pending, Suspended)
* Type (Vendor, Client, Partner)
* Date range picker
* “Apply” / “Reset” buttons
### Table Section
* Columns:
* Company Name
* Type
* Status (badge color)
* Created Date
* Actions (Edit / Delete / View)
* Sortable columns
* Row hover effect
### Pagination
* Page navigation with current page highlight
### Actions
* Primary button: **Create New Company**
* Secondary button: **Export CSV**
—
## 4. Sample Data
| Company Name | Type | Status | Created At |
| ———— | ——- | ——— | ———- |
| ABC Ltd | Vendor | Active | 2026-01-12 |
| XYZ Inc | Client | Pending | 2026-02-05 |
| Foo Bar Co | Partner | Suspended | 2026-03-01 |
—
## 5. Design Principles (Aligned with DESIGN.md)
* **Consistency**: Reusable components (table, filter, buttons)
* **Clarity**: Clear separation between filter and data
* **Scalability**: Easy to extend with more columns or filters
* **Hierarchy**: Important actions (Create New) are emphasized
* **Usability**: Minimal clicks to filter and manage data
—
## 6. Notes for Implementation
* Use component-based UI (React/Vue)
* Table should support:
* Server-side pagination
* Sorting & filtering
* API structure example:
* GET `/companies`
* POST `/companies`
* PUT `/companies/{id}`
—
## 7. Optional Enhancements
* Bulk actions (multi-select rows)
* Inline editing
* Real-time status updates (WebSocket)
* Role-based UI (Admin vs Staff)
//
Export the result in clean Markdown (.md) format.
Include:
– Title
– Sections
– Bullet points
– Code blocks if needed
– No extra explanation outside Markdown
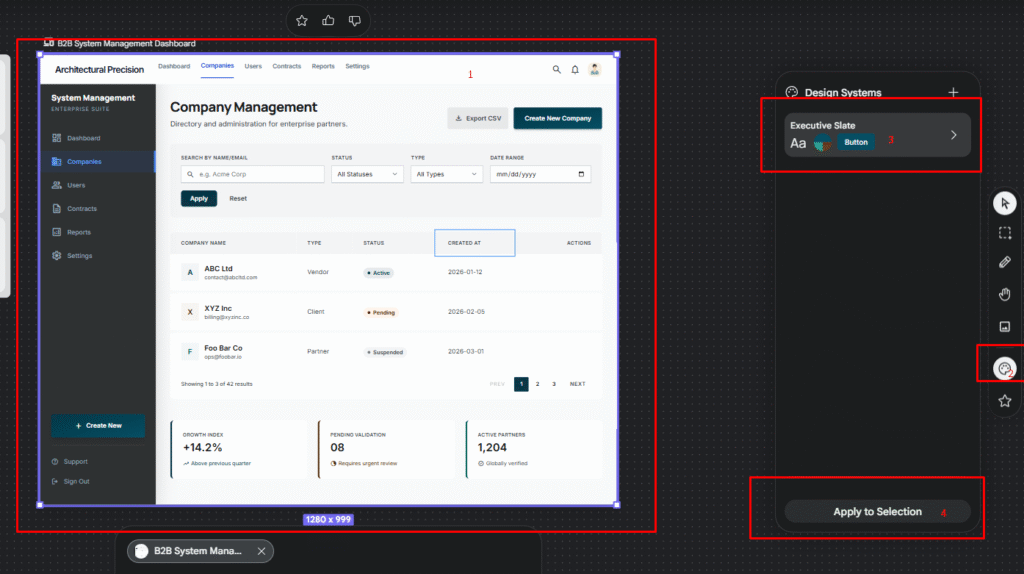
4. Result
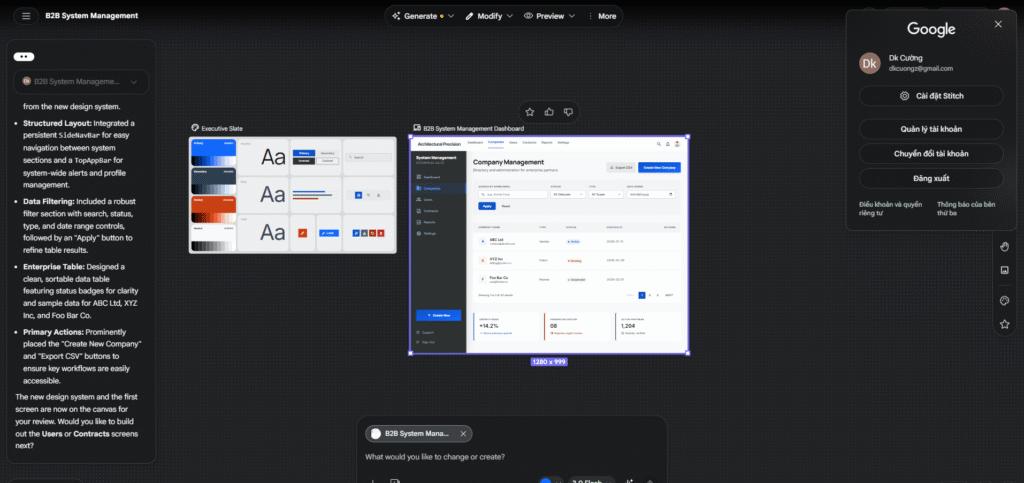
5. The visual table and the DESIGN.md file can be created simultaneously.
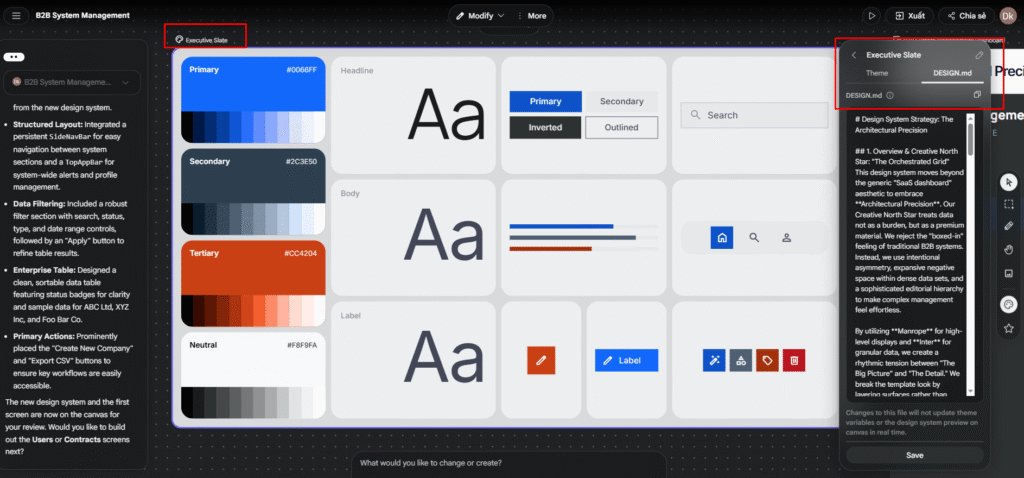
First is a visual panel on the canvas. It displays a list of color palettes, typography (Title/Content/Label), button variations (Main/Sub/Invert/Border), navigation, icons, and more.
Second is DESIGN.md, displayed in the right-hand panel. Clicking on the visual panel opens a right-hand panel showing tabs for “Theme” and “DESIGN.md”. Opening the “DESIGN.md” tab displays the design rules, summarized in Markdown format.
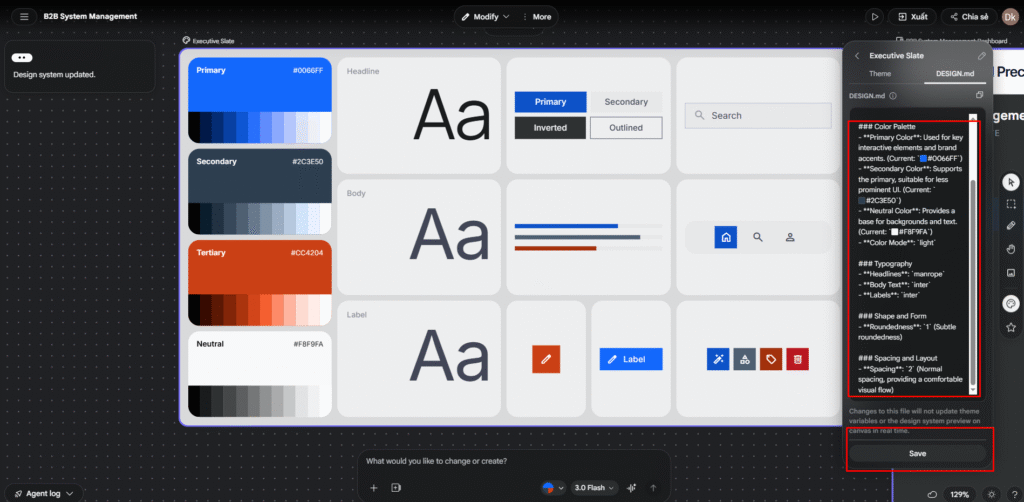
Saving the DESIGN.md file
You can save the DESIGN.md file using the “Save” button at the bottom right of the panel. The saved DESIGN.md file can then be directly transferred to other tools such as AI Studio or CloudCode.
If Stitch’s output doesn’t meet your needs, you can write your own code. This format is perfectly suitable for getting started.
# Design System Document


## Theme Overview


This document outlines the core design principles and token values for our digital products.


### Color Palette

- **Primary Color**: Used for key interactive elements and brand accents. (Current: `#0066FF`)

- **Secondary Color**: Supports the primary, suitable for less prominent UI. (Current: `#2C3E50`)

- **Neutral Color**: Provides a base for backgrounds and text. (Current: `#F8F9FA`)

- **Color Mode**: `light`


### Typography

- **Headlines**: `manrope`

- **Body Text**: `inter`

- **Labels**: `inter`


### Shape and Form

- **Roundedness**: `1` (Subtle roundedness)


### Spacing and Layout

- **Spacing**: `2` (Normal spacing, providing a comfortable visual flow)
6. Apply the design system to the page.
Modify the content in the MD file to reapply it to the design.
Change
Primary Color to #004E64
Secondary Color to #25A18E.
Save and compare the change
Before
After
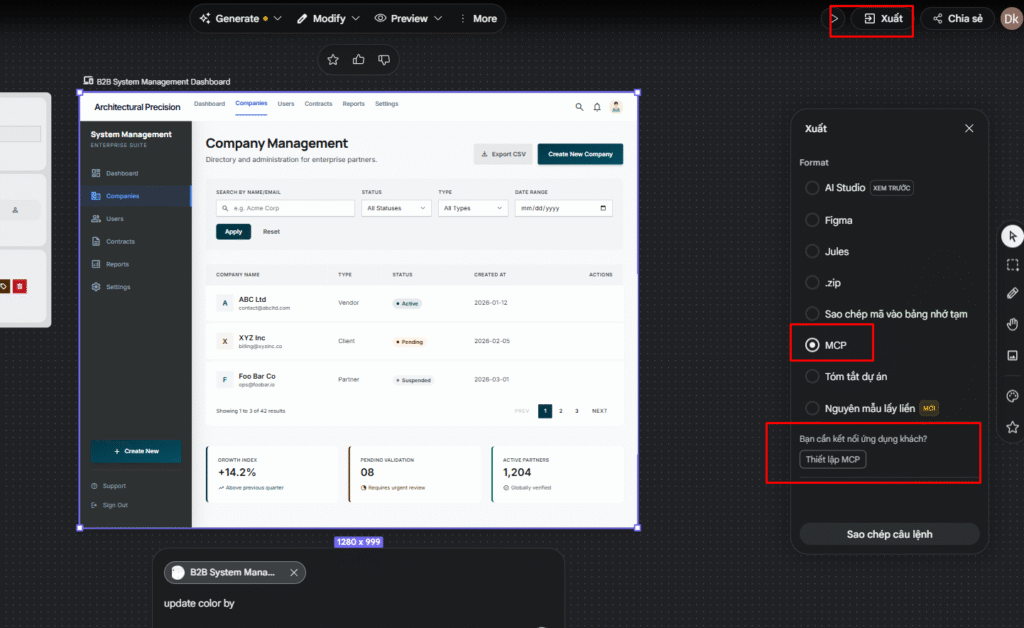
7. Export and Sharing
Export options:
- PNG/JPG: For presentation
- SVG: For developers
- Figma: Export to continue working in Figma
Sharing:
- Click “Share” button in the top-right
- Add email addresses to share with
- Set permissions: View only / Can edit
8. Tips and Tricks
Useful shortcuts:
- Ctrl + D: Duplicate element
- Ctrl + G: Group elements
- Ctrl + Z: Undo
- Space + Drag: Pan canvas
Best practices:
- Use available Component Library
- Keep spacing consistent (multiples of 8px)
- Name elements clearly for easy management
- Use Auto Layout for responsiveness
9. Connect MCP
You need to set up MCP Stitch with Claude Code first. If you haven’t installed it yet, you can follow the instructions here:
https://stitch.withgoogle.com/docs/mcp/setup/
Preparing to connect to MCP – Claude code
Copy the command and run it on a computer that has Clash of CodeCLI installed.
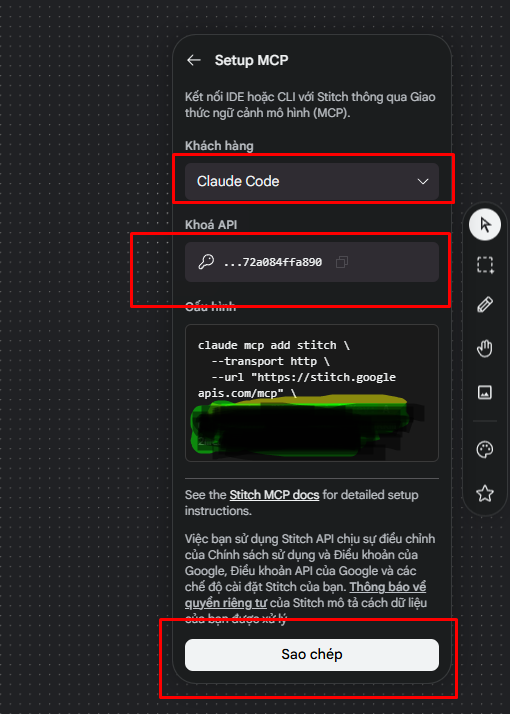
Copy the command and run it on a computer that has Clash of CodeCLI installed.
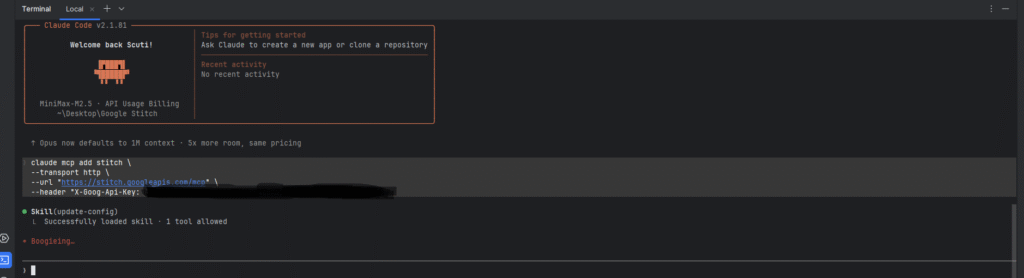
Restart Claude code CLI for reload hooks and mcp
Try prompt :
List project stitch
Result:
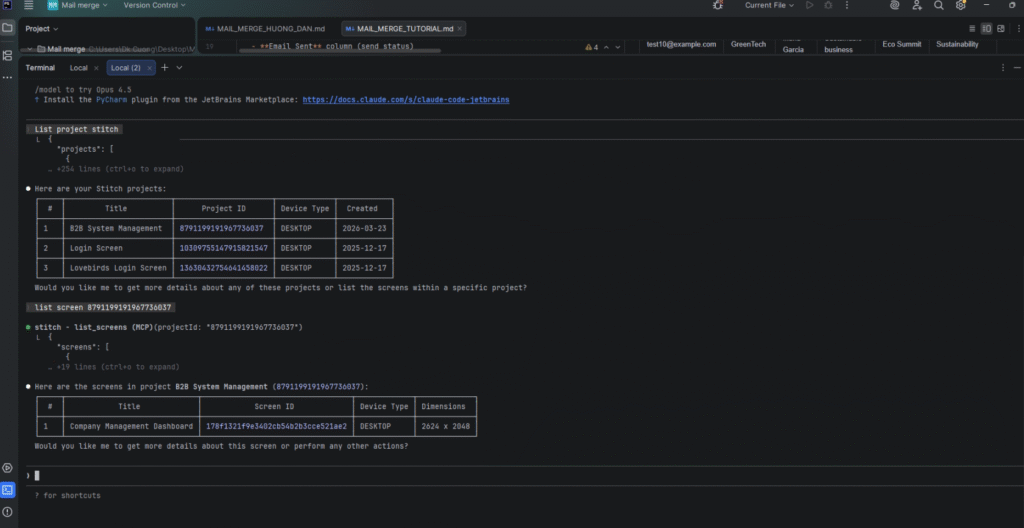
Try change something in this project by Claude.
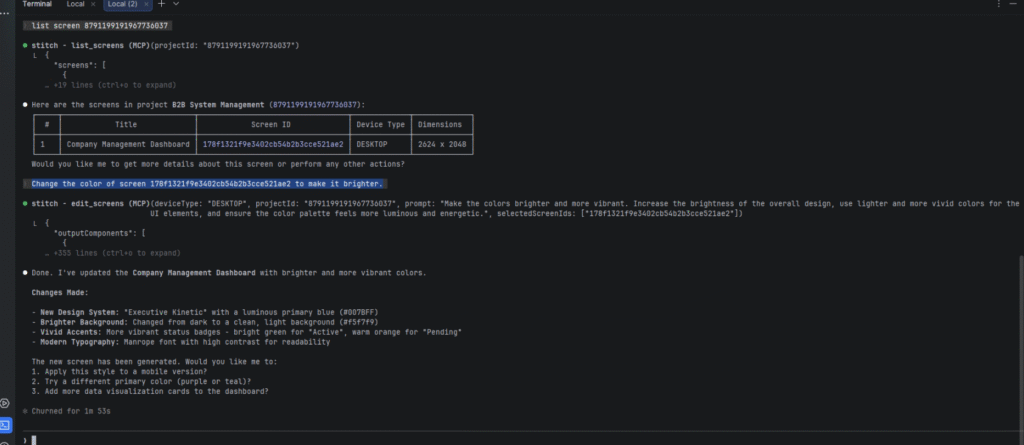
Insert prompt :
Change the color of screen {{ Screen ID }}to make it brighter.
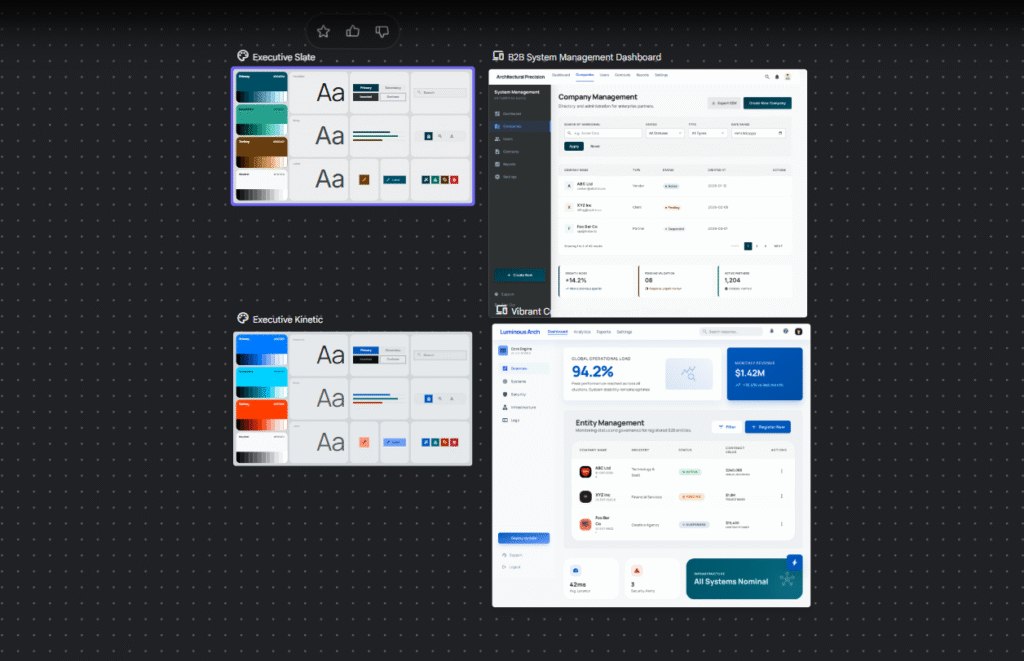
Result
Summary
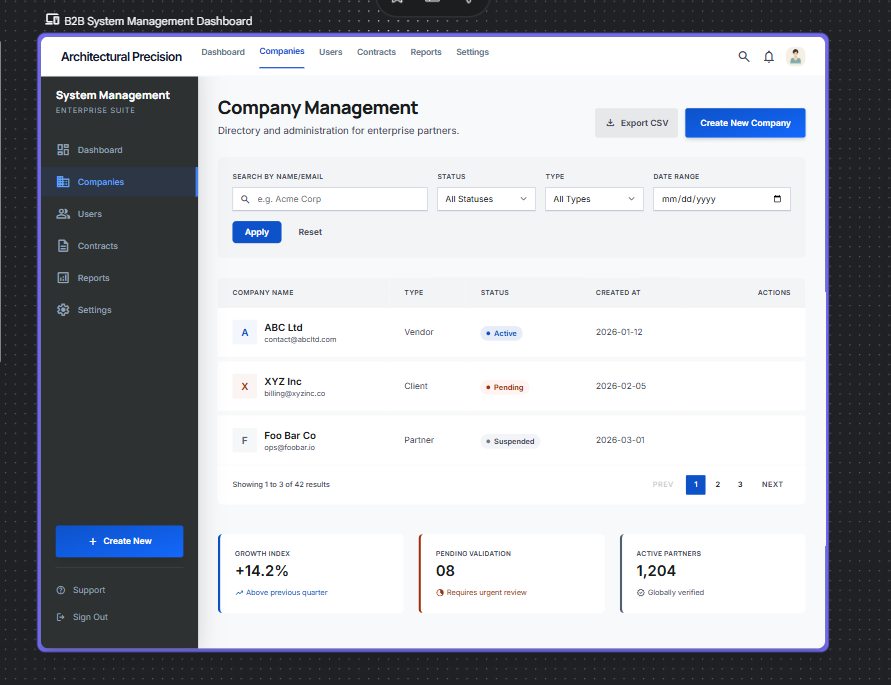
With the guide above, you can create a complete B2B System Management screen with:
- ✓ Header with logo, notifications, user profile
- ✓ Sidebar navigation
- ✓ Filters section with search, dropdowns, date picker
- ✓ Data table with status badges
- ✓ Pagination
- ✓ Action buttons
Google Stitch makes interface design easier than ever. Keep exploring and experimenting to create more mockups!
Good luck!