
Actually, I had previously tried creating SEO articles using Dify. You can read about that experience in the article “Trying to Create SEO Articles with Dify.” However, at that time, I gave up on creating them through the workflow and used an agent instead. The reason was that there was no Iteration (loop processing) in the workflow at the time.
However, Dify v0.6.9 was released on May 31, 2024, and Iteration was implemented! I immediately tried using the Iteration feature to create SEO articles. While I did manage to do it, whether it reached a practical level or not is debatable.
That said, I believe I can convey how to use Iteration through this article, so I hope you’ll check it out! Actually, the system I tried to implement using Dify’s workflow is something our company already has in place, and we offer a service called “AI Article Creation Support” that utilizes it. If you’re looking for high-quality articles at a reasonable price, please consider using our service!
Preparation
Setting Up the Dify Environment
This time, the operation is based on running it on a local MacOS PC.
The method for setting up Dify on a local PC is detailed in the article “Trying to Create SEO Articles with Dify,” so please refer to that.
Additionally, Dify is a very active open-source software (OSS) and is frequently updated, so it is necessary to keep the source code up to date. You can find how to update it in the article “Using GPT-4o with Dify in a Local Environment.”
Understanding the Latest Specifications of Dify
To create articles using Dify’s workflow, the Iteration function is essential.
Even if you create a long article with a single prompt, it won’t be of high quality. The key to improving the output quality of LLMs is to break down tasks and have them do as small of a task as possible. When creating articles, the same principle applies: first decide the structure of the headings, and then request the LLM to create small, segmented articles for each heading.
Thus, the part where “articles are output for each heading” requires loop processing, and Iteration is used for this purpose.
So, I researched how to use Iteration, but… I couldn’t find any information at all! Why!? Could it be that the official documentation hasn’t caught up with the updates? As of writing this article on June 14, 2024, Iteration hasn’t been added to the Nodes in the workflow.
The only thing available is a video announcing the release. So, I proceeded with a lot of trial and error. The following is a summary of the results, but it was incredibly challenging.
Designing the Workflow on Dify
Defining Inputs and Outputs
A workflow is created by connecting various “blocks” that perform different processes. The first step is to simply define what the final output of this workflow will be.
In this article, we will create the workflow based on the following:
- Inputs
- Reference URL for rewriting
- Keywords to rank high
- Co-occurrence words
- Suggested words
- Target audience
- Title
- Introduction
- Key considerations for article creation
- Outputs
- Heading structure
- Content for each heading
In other words, the workflow will be designed to summarize and rewrite existing articles based on the keywords, target audience, and other predetermined information.
Designing the Process Flow
The goal is to create articles using the following general process flow:
- Scrape the provided URL to retrieve the article content.
- Summarize the entire article and create a heading structure that succinctly conveys the content.
- Use the LLM to create a bulleted summary of the article.
- Use the LLM to convert the bullet points into a heading structure.
- Use the LLM to create the heading structure.
- Create the article for each heading.
- Create a template and compile the content into a complete article.
Creating Each Block in the Workflow on Dify

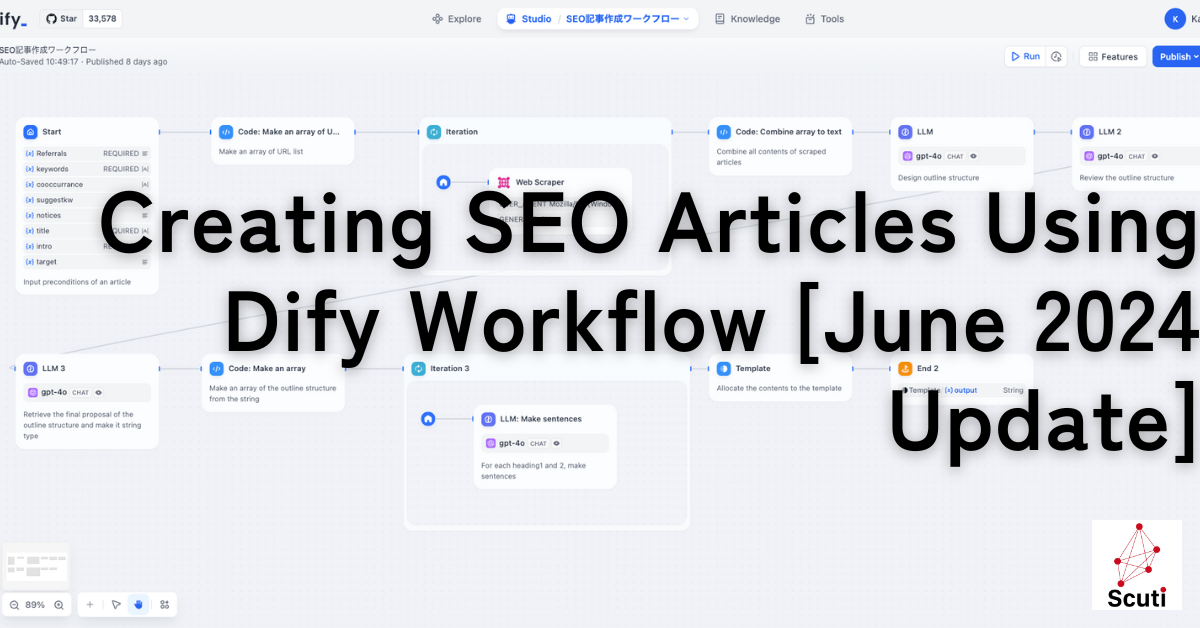
Here’s what the overall process looks like. Below is an explanation of what each block does.
“Wait… does it really require this much setup just to create an article?” If you’re wondering that, you’re absolutely right! To create practical agents or workflows, quite a lot of setup is necessary. This requires a significant amount of learning, not only about generative AI itself but also about Dify’s specifications.
If you’re interested in implementing Dify but want to leave all the hassle to someone else, please feel free to contact us!
Inquire about our Dify implementation support service
Step 1: Start
- Block: Start
- Input: All the input items mentioned above
- Output: None
This step simply specifies the input items listed earlier.
Step 2: Create an Array of Source URLs

- Block: Code
- Input: String of URLs
- Output: Array of Strings
In Step 1, the list of URLs is entered as a string with line breaks, which is then converted into an array using Python. This is necessary because the input for the Iteration used later needs to be in array format.
Step 3: Scraping All URLs

- Block: Iteration
- Input: Array of URL strings
- Output: String (Scraping results)
Iteration is used for loop processing. When using Iteration, you need to specify both the input to Iteration and the output from it.
Step 3-1: Scraping Each URL

- Block: Web Scraper
- Input: Item (Each element of the array being referenced within Iteration’s loop process. In this case, each URL individually)
- Output: String (Scraping results)
In a previous article, I used a tool called Crawler to retrieve content from URLs, but since Crawler didn’t work for some reason this time, I used another tool called Web Scraper. If you pass it a URL, it retrieves the content for you.
Step 4: Merge All Scraping Results

- Block: Code
- Input: Array of strings (Scraping results)
- Output: String
In the following steps, I want to merge the content of the given URLs and summarize it, so I simply combine the contents of all the articles from the URLs.
Step 5: Create the Article Heading Structure with GPT-4o

- Block: LLM (Specify the model as GPT-4o)
- Input: String (Merged content from the previous articles)
- Output: String (Proposed heading structure)
Give the merged content of the previous articles to GPT-4o, and it will summarize it into bullet points. Based on that summary, GPT-4o will create a proposed heading structure for the article.
Step 6: Review and Refine the Heading Structure with GPT-4o

- Block: LLM (Specify the model as GPT-4o)
- Input: String (Proposed heading structure)
- Output: String (Finalized heading structure)
Have GPT-4o review the proposed heading structure created in the previous step and refine it. Adding this step significantly improves the quality.
Step 7: Convert the Heading Structure into a Python Array

- Block: LLM (Specify the model as GPT-4o)
- Input: String (Finalized heading structure)
- Output: String (Array-formatted string)
At this point, things start to get a bit forceful. Due to Iteration’s limitations, A) nesting is not allowed (you cannot create more than two loops), and B) the input must be an array (JSON cannot be passed). This was a bottleneck, and it became impossible to “loop through heading 1 and then loop through heading 2 within it to create articles for each,” which is a 1
relationship.
It might be a bit hard to understand, but here’s an example:
[ [“Heading 1: First heading 1”, “Heading 2: First heading 2”, “Summary: Corresponding summary for heading 2”],
[“Heading 1: First heading 1”, “Heading 2: Second heading 2”, “Summary: Corresponding summary for heading 2”],
[“Heading 1: Second heading 1”, “Heading 2: First heading 2”, “Summary: Corresponding summary for heading 2”],
…
[“Heading 1: nth heading 1”, “Heading 2: First heading 2”, “Summary: Corresponding summary for heading 2”],
[“Heading 1: nth heading 1”, “Heading 2: Second heading 2”, “Summary: Corresponding summary for heading 2”],
…
[“Heading 1: nth heading 1”, “Heading 2: nth heading 2”, “Summary: Corresponding summary for heading 2”]
]
GPT-4o generates an array like the one above and outputs it as a string for now.
Step 8: Convert the “Array-like” String Data into an Actual Array

- Block: Code
- Input: String (The array-formatted string)
- Output: Array of Strings
Since the LLM block can only output strings, the previous step outputs a string formatted to resemble an array structure. A Python program is then used to forcefully convert this into an array to be passed into Iteration.
Step 9: Create the Articles for All Headings

- Block: Iteration
- Input: Array of Strings
- Output: Array of Strings (Article content)
The array of headings is looped through, and the body of the article is created for each heading.
Step 9-1: Create the Article for Each Heading

- Block: LLM (Specify the model as GPT-4o)
- Input: Item (The element from the array being referenced within Iteration’s loop process. In this case, it’s a string combining heading 1 and heading 2)
- Output: String (The article body)
Using the headings 1 and 2 passed from Iteration, along with the other inputs from Step 1, GPT-4o will create the article body. Specific conditions are provided to ensure the desired content is generated when creating the article body.
Step 10: Apply the Template

- Block: Template
- Input: Array of Strings (The article body)
- Output: String
This is more of an additional step, but to make the output resemble an article, we apply a template that includes the title, introduction, headings, and body content. Dify’s template uses Jinja2.
Check the Output

I don’t quite understand… haha.
Summary
Points of Improvement
- After creating the heading structure with GPT-4o, reviewing and refining the structure with GPT-4o produces quite a good result.
- Since multiple loops cannot be used in Iteration and JSON cannot be passed as input, I resorted to having GPT-4o create Python array-like strings (which felt a bit extreme), but I managed to output the entire workflow. It was tough…
Areas for Improvement and Things That Couldn’t Be Achieved
- Since I had GPT-4o generate arrays, the output was sometimes unstable, and occasionally it would produce a non-array structure, causing Python to throw errors.
- I wanted to create a structure like:
“Heading 1 > Heading 2 > Body, Heading 2 > Body… Body, Heading 1 > Heading 2 >…” but I just couldn’t manage it. If anyone who is more experienced with workflows has any ideas, please get in touch…!
Impressions
- It’s quite challenging to assign a task as large as creating SEO-effective articles to a workflow. Using an agent seems like a better option.
- Workflows seem better suited for processes that can be done in fewer, simpler steps.
- This might be saying the obvious, but if you want to create a workflow that is practical for business, Make.com would be a better choice. Make.com offers far more flexibility and scalability.
For inquiries about system development using generative AI, please contact us here.
Thank you for reading until the end!
In fact, the system I was trying to implement with Dify’s workflow is something our company already has, and we offer it as an “AI Article Creation Service.” If you’re looking for a way to continuously create high-quality articles at a reasonable price, please feel free to use our service!
Our company provides an “AI Consulting” service, which includes selecting large language models (LLMs) and architectures, conducting technical verifications, prototyping, and system development using generative AI, as well as in-house training and education for your employees.
We also offer “Secure GAI,” a solution similar to ChatGPT that can be used in business environments.
Of course, we are also happy to assist with the setup and implementation of Dify.
If this article has sparked your interest in generative AI or if you have any needs for system integration with generative AI, please feel free to contact us using the form below!
